
Installing a garage door can be really scary at first especially if you have never done it before. Garage doors have panels, tight springs and many moving parts so it is easy to feel overwhelmed. But if you prepare yourself get the tools and learn about garage doors you can do it yourself.
This guide is for people who are new to doing things themselves. It will walk you through everything you need to know about garage door installation from getting ready and being the safe to step-by-step tips. This way you can install your garage door with confidence. Also know that your garage door installation will go smoothly.
Is DIY Garage Door Installation Right for You?
Installing a garage door by yourself can save you money. It requires mechanical skills, the right tools and being very careful about safety.
Garage doors have parts, high-tension springs and need to be aligned just right so there is little room for mistakes.
If you do not have experience, the right equipment or confidence hiring a professional is an idea because it reduces risks and ensures your garage door will work well for a long time.
You Should Call a Professional If:
You should call a professional if you are not comfortable handling heavy garage door parts have a sized opening or if your door uses high-tension torsion or extension springs.
Installing a garage door involves working at heights using power tools. There are serious safety risks. Professionals will make sure everything fits correctly handle springs safely follow codes and ensure your garage door works well for a time.
There is no shame in hiring the professional to install your garage door. Garage doors are heavy and powerful. Safety is always the important thing. When it comes to your garage door installation safety should be your priority.
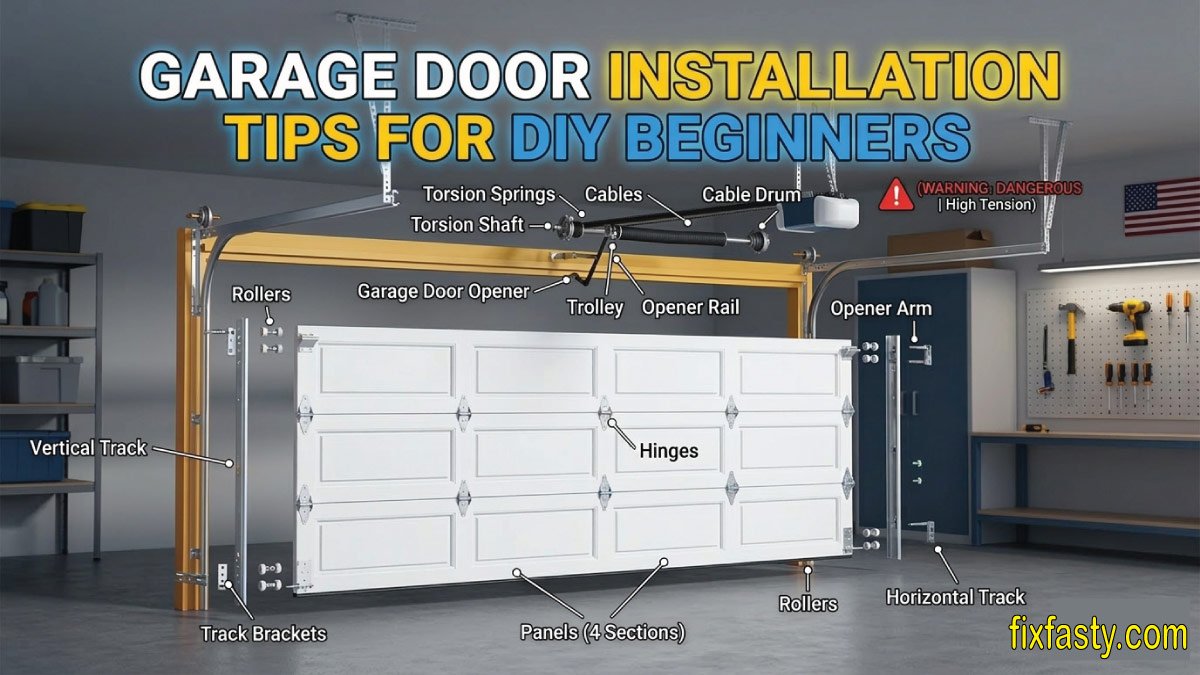
Understand the Basics of Garage Door Installation
Each component must be installed in the correct order and aligned properly for the door to work safely.
Safety First: What Every DIY Beginner Must Know
Install the garage door involves parts high-tension springs and work at heights so safety is the top priority. Following safety rules will help reduce the risk of getting hurt keep your workspace under control and ensure your garage door installation goes smoothly from start to finish.
Essential Safety Tips
-
Always wear safety glasses and gloves
-
Never work alone—have another adult assist you
-
Keep children and pets away from the work area
-
Follow manufacturer instructions exactly
-
Never adjust torsion springs without proper training
If you feel unsure at any stage, stop and contact a professional installer.
Tools You will Need for Garage Door Installation
Having the right tools is essential for a smooth and safe garage door installation. The right equipment will help you work accurately reduce physical strain and minimized the risk of mistakes or injuries during each step of the process.
Basic Tools List
Power drill: A power drill speeds up fasten screws and bolts, make the installation quicker and more consistent while reduce hand fatigue during repetitive tasks.
Wrenches and socket set: These are needed to tighten nuts and bolts securely, ensure tracks, brackets, and hardware stay firmly in place during operation.
Screwdrivers: Screwdrivers are used for smaller fasteners and adjustments, allow you to secure hinges, brackets, and also other components with better control.
Level: A level helps ensure tracks and panels are perfectly straight, which is critical for smooth movement and prevent the door from binding.
Tape measure: Accurate measurements are necessary to align tracks, panels, and also hardware properly, help avoid gaps, misalignment, or operational problems.
Stepladder: A sturdy stepladder allows safe access to higher areas like tracks, springs, and the opener, reducing the risk of falls or overreach.
Hammer: A hammer is useful for minor adjustments, tap the parts into place, and secure the certain hardware during the installation process.
Locking pliers: Locking pliers hold parts securely in position, help stabilize tracks or cables while you tighten or adjust other components.
Being prepared saves time and reduces frustration.
Preparing the Garage Opening
Preparing the garage opening is essential for an installation. A clean, level and structurally sound opening will help ensure that your garage door is aligned correctly works safely and prevents adjustments or repairs later on.
Preparation Steps
Clear the garage area: Remove vehicles, tools, and stored items to create a safe, open workspace with enough room to move, lift, and position door components.
Remove the old door and hardware: Carefully take down existing panels, tracks, springs, and brackets to avoid obstructions and ensure the new system fits properly.
Check that the opening is level and square: Use the level and measuring tape to confirm the opening is even, preventing the door from binding or operating unevenly.
Repair any damaged framing: Fix cracked wood, loose boards, or weak framing to provide the strong support for tracks, brackets, and the door’s overall weight.
Ensure there is enough headroom and side room: Verify there is adequate space above and beside the opening for tracks, springs, and the opener to function correctly.
Proper preparation prevents alignment issues later.
Step-by-Step Garage Door Installation Tips
Installing a garage door may seem complicated. Break it down into clear manageable steps makes it much easier for beginners. Being careful aligning everything right and being patient at each stage will ensure that your garage door operates safely moves smoothly and works well for a long time.
Tools and Their Purpose in Garage Door Installation
| Tool | Purpose | Why It’s Important |
|---|---|---|
| Power drill | Install brackets and tracks | Saves time and effort |
| Level | Align tracks and panels | Ensures smooth operation |
| Wrenches | Tighten bolts and nuts | Prevents loose hardware |
| Stepladder | Reach overhead areas | Improves safety |
| Locking pliers | Hold parts in place | Adds stability |
Common Mistakes DIY Beginners Should Avoid
Installing a garage door requires precision and attention to detail. Even small mistakes can lead to operation, damage or safety hazards. Being patient follow instructions and checking your work at every stage is essential to prevent costly mistakes and ensure long-term reliability.
Frequent Errors
Not leveling the bottom panel: Causes misalignment, uneven movement, and long-term operational problems.
Overtightening bolts: Warps components, strips threads, and restricts smooth door movement.
Ignoring manufacturer instructions: Leads to unsafe installation, poor performance, and warranty issues.
Skipping safety checks: Increases accident risk and causes premature garage door failure.
Improper spring handling: Extremely dangerous, cause serious injury or major door damage.
Being patient and precise helps prevent these issues.
When to Stop and Call a Professional
Installing a garage door by yourself can save you money. Knowing when to stop is essential for safety. If springs need adjustment cables will not align the door feels unusually heavy or movement is uneven you need help.
High-tension components and balance issues are dangerous without training. If you feel unsure at any step calling a professional will prevent injury avoid damage and ensure safe reliable garage door operation.
DIY vs Professional Garage Door Installation
| Factor | DIY Installation | Professional Installation |
|---|---|---|
| Cost | Lower | Higher |
| Time | Longer | Faster |
| Safety | Moderate risk | Safer |
| Skill required | High | Low |
| Warranty protection | Limited | Often included |
How Long Does Garage Door Installation Take?
For beginners installing a garage door is a time- task that can take anywhere from 6 to 10 hours or even longer depending on your experience, tools and the type of door.
Professionals, with tools and expertise typically complete the same installation in 2 to 4 hours. Rushing the process increases the risk of mistakes, misalignment or injury.
Take your time ensures accuracy, proper assembly and a safer reliable garage door operation.
Tips for a Smooth Installation Experience
A smooth garage door installation starts with planning and a calm approach. Prepare the your workspace organizing materials and working patiently helps reduce mistakes and stress.
By following instructions and pace yourself you can improve safety save time and ensure the door operates smoothly and reliably after installation.
-
Read the full instruction manual before starting
-
Lay out and organize all parts in advance
-
Label hardware to prevent mix-ups
-
Take short breaks to avoid fatigue
-
Ask for help when lifting or align the parts
A calm, organized approach makes the process much easier.
After Installation: Maintenance Tips
Proper maintenance keeps your garage door operating extends its lifespan and ensures safety. Regular inspections and preventive care help identify issues before they become major problems protecting both your door and anyone who uses it daily.
-
Lubricate rollers and hinges twice a year to reduce friction, noise, and long-term wear on move the components.
-
Inspect cables and springs monthly for fraying, rust, or damage to prevent safety hazards early.
-
Test safety sensors regularly to ensure proper obstacle detection and automatic door reversal.
-
Tighten loose hardware periodically to maintain alignment, stability, and safe garage door operation.
Proper maintenance extends the life and performance of your new garage door.
Final Thoughts
Installing a garage door as a DIY beginner is a rewarding project. With planning the right tools and a strong focus on safety many homeowners can successfully complete the job. However it is equally important to know your limits and seek help when needed.
By following these garage door installation tips, for DIY beginners you will be better prepared to handle the process confidently. Whether you complete the installation yourself or get help with certain steps the goal is the same: a secure smooth-operating garage door that serves your home well for years to come.
👉 Choosing the right garage door type is essential for style, security, and functionality. This guide explains the main garage door types, their benefits, materials, and maintenance needs, helping you select the perfect door for your home. Learn how to match design, durability, and budget for long-lasting performance. Read the full post to make an informed decision confidently.

Engineer Ali Usman is a professional garage door expert and author at FixFasty, with over 10 years of hands-on experience in garage door systems and mechanical maintenance. He writes clear, step-by-step guides on garage door repairs, parts, and safety practices, helping homeowners fix problems correctly and maintain smooth, secure, and long-lasting garage door performance.