
Garage door springs are the unsung heroes of your garage system. They bear the weight of the door and allow smooth opening and closing.
Over time, however, these springs can become dry, rusty, or squeaky, causing noise, uneven operation, or even premature wear. Proper lubrication keeps them functioning safely and efficiently.
In this guide, you will learn how to lubricate garage door springs safely, the tools you need, recommended lubricants, and expert tips to prolong your spring’s lifespan.
Why Lubricating Garage Door Springs is Important
Garage door springs are under constant high tension, making them both essential and potentially dangerous if neglected. Regular lubrication helps reduce friction and noise, ensuring the door operates smoothly without unnecessary strain on its components.
Beyond smoother operation, lubricating springs protects them from rust and corrosion, extending their lifespan and the life of related parts. Think of it as preventive “healthcare” for your garage door—small maintenance today can prevent costly repairs tomorrow.
Reduces friction and noise
Protects against rust and corrosion
Improves the door’s smooth operation
Extends the life of springs and related components
Think of spring lubrication as “healthcare” for your garage door—small preventive care prevents costly repairs.
Types of Garage Door Springs
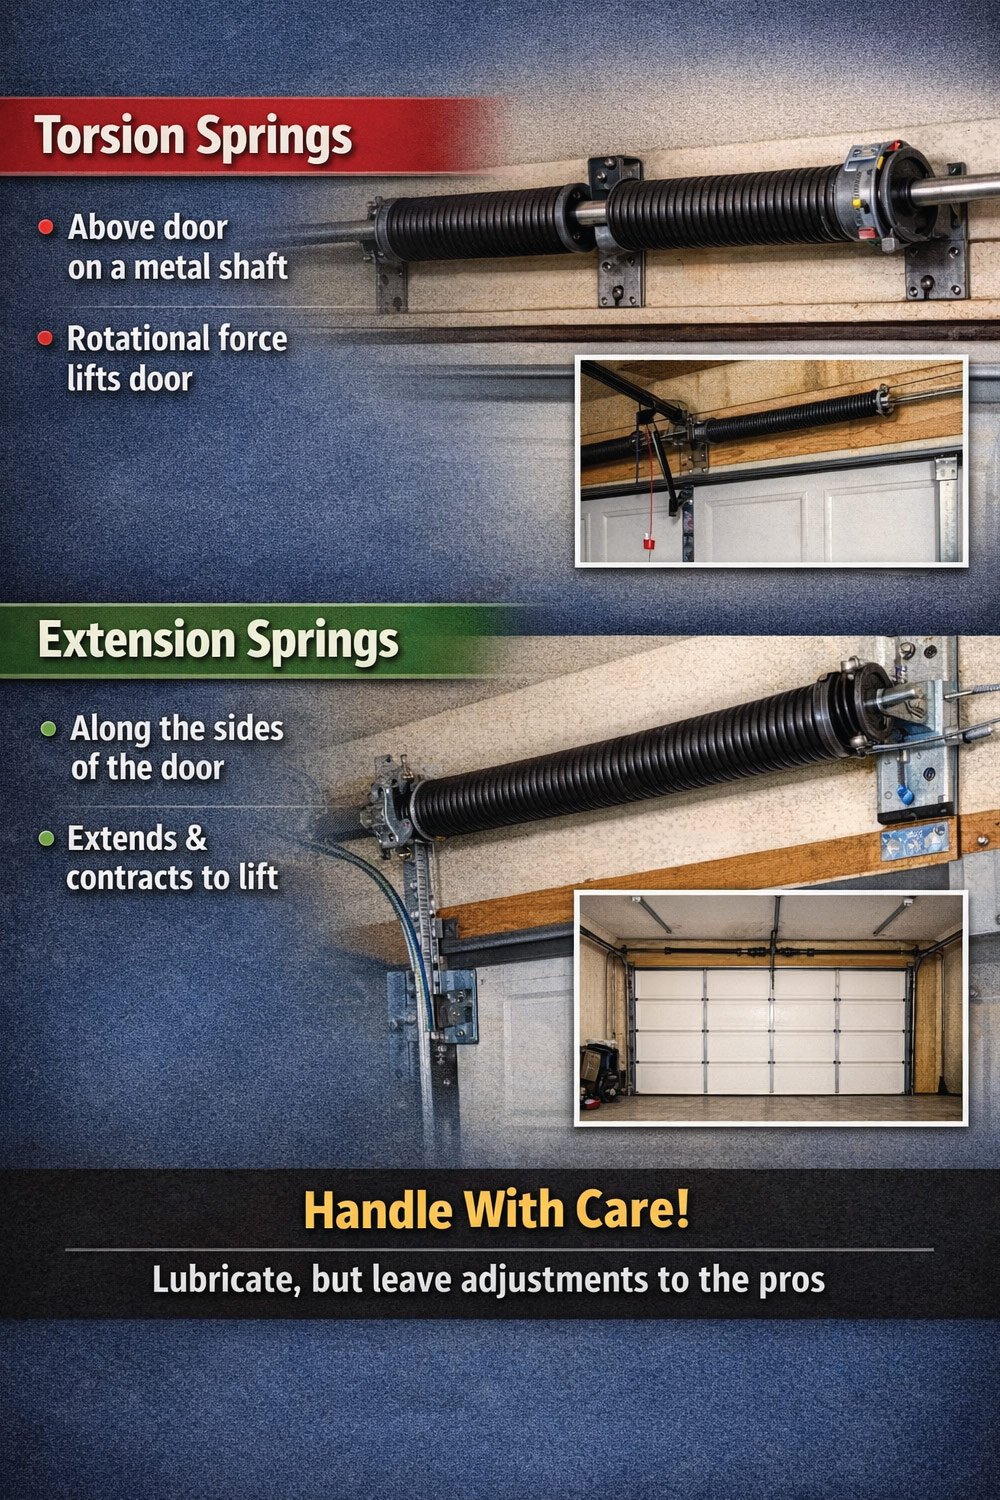
Before lubricating your garage door springs, it’s important to know which type you have, as each functions differently. Torsion springs sit above the door on a metal shaft, coiled under high tension, and lift the door using rotational force.
Extension springs, mounted along the sides of the door, stretch and contract to raise and lower it, and are easier to replace but remain hazardous.
Both types demand caution—while lubrication is safe when done correctly, major adjustments should only be performed by trained professionals.
1- Torsion Springs
Torsion springs are mounted above the garage door on a metal shaft. They are tightly coiled and store high tension, using rotational force to lift and balance the door. These springs are durable but require extreme caution during maintenance due to stored energy.
2- Extension Springs
Extension springs are located on both sides of the garage door, running parallel to the tracks. They work by stretching and contracting to raise and lower the door. While easier to replace than torsion springs, they can still be dangerous if not handled properly.
Both types require care—never attempt major adjustments yourself unless trained. Lubrication is safe if done properly, but spring tension adjustments are not.
Step-by-Step Guide: Lubricating Garage Door Springs
Maintaining your garage door springs is essential for smooth, quiet operation and prolonging their lifespan. Proper lubrication reduces friction, prevents wear, and keeps the door functioning safely.
However, springs are under extreme tension, so caution is crucial. This step-by-step guide walks you through safely inspecting, cleaning, and lubricating both torsion and extension springs, ensuring your garage door runs efficiently while minimizing the risk of damage or injury.
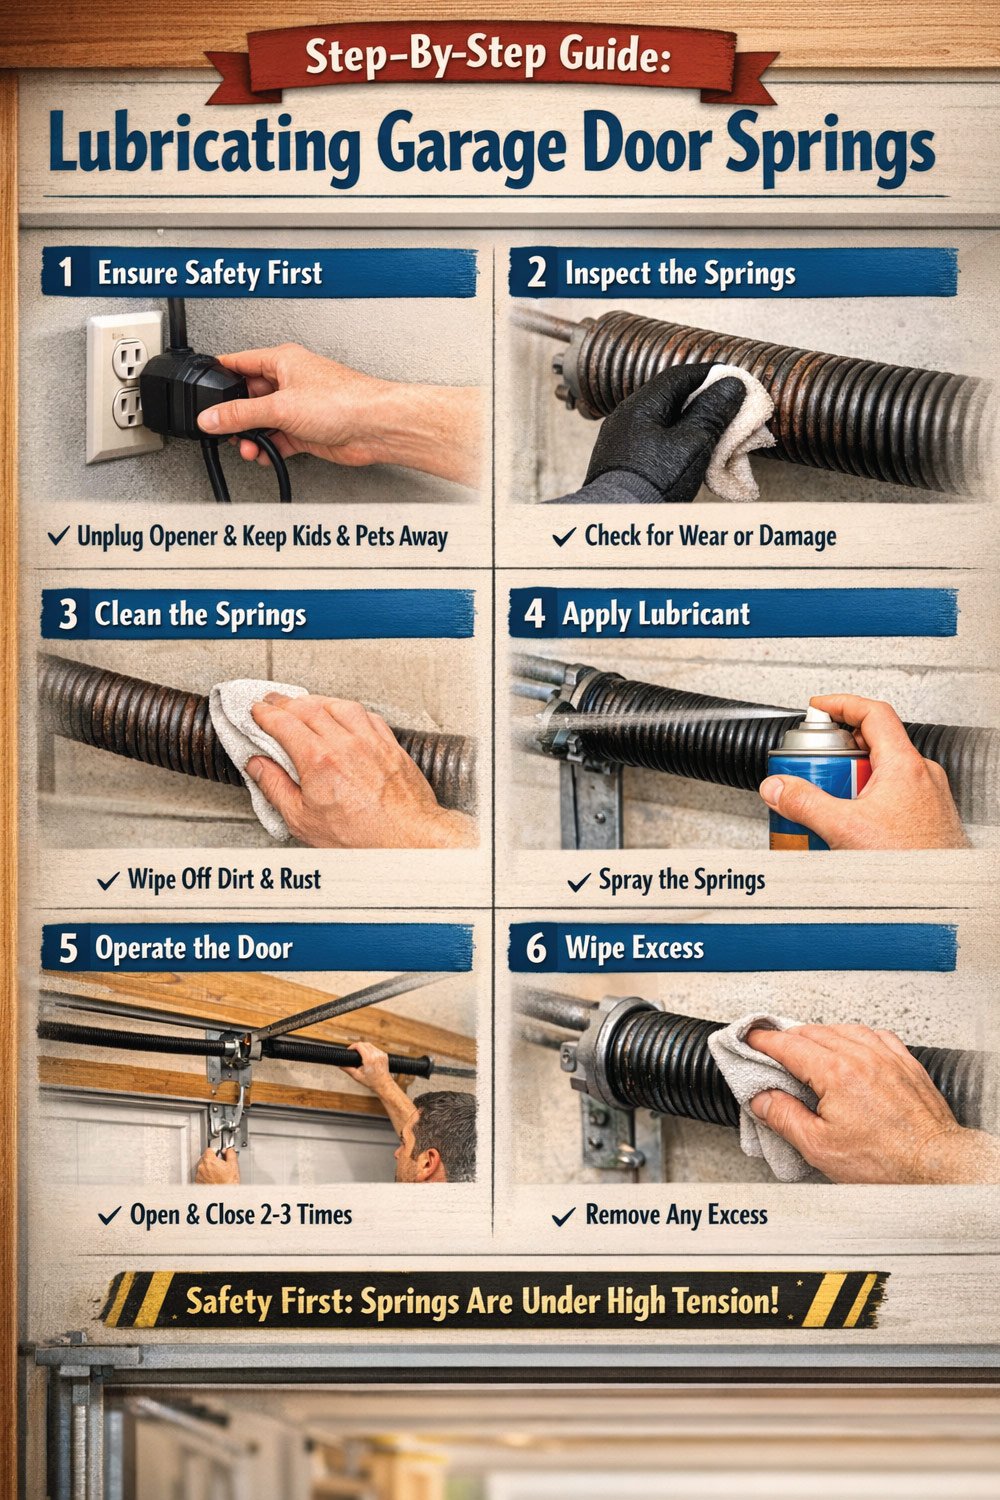
Step 1: Ensure Safety First
Before touching your garage door springs, prioritize safety. Disconnect the garage door opener to prevent accidental movement and keep children and pets away. Springs are under extreme tension, and even minor mishandling can cause serious injury. Taking these precautions ensures you can work calmly and effectively without putting yourself or others at risk.
Disconnect the garage door opener to prevent accidental movement
Keep children and pets away from the area
Safety first—garage springs are under extreme tension and can cause serious injury if mishandled.
Step 2: Inspect the Springs
Careful inspection is crucial before lubrication. Look for rust, wear, or visible damage, and check for frayed or broken cables on extension springs. Any signs of damage mean you should stop immediately and call a professional. Identifying issues early prevents accidents and ensures your maintenance won’t worsen existing problems.
Check for rust, wear, or visible damage
Look for frayed or broken cables on extension springs
If you see damage, do not proceed—call a professional
Step 3: Clean the Springs
Cleaning the springs removes dirt, dust, and old lubricant that can interfere with smooth operation. Use a clean cloth to wipe the surface, and a soft brush for light rust if needed. Proper cleaning allows the new lubricant to adhere better, extending spring life and preventing unnecessary friction or noise.
Wipe the surface of the springs with a clean cloth
Remove dirt, dust, or old lubricant
Use a soft brush to remove light rust if necessary
Step 4: Apply Lubricant
Lubrication reduces friction, noise, and wear. For torsion springs, spray along the coil from top to bottom, and for extension springs, along the full length. Focus on areas where coils touch or rub. Use short bursts and avoid oversaturation to ensure the lubricant penetrates properly without creating messy drips.
For torsion springs, spray along the coil, top and bottom
For extension springs, spray along the length of the spring
Focus on areas where coils touch or rub against each other
Use short bursts, avoid oversaturation
Step 5: Operate the Garage Door
After applying lubricant, manually open and close the garage door 2–3 times. This helps distribute the lubricant evenly across the springs and other moving components. Pay attention to how smoothly and quietly the door moves—any unusual noise or resistance may indicate further inspection is needed.
Slowly open and close the door 2–3 times manually
This distributes lubricant evenly across the spring
Listen for smooth, quiet operation
Step 6: Wipe Excess Lubricant
Finally, remove any drips or overspray with a clean cloth. Excess lubricant can create a slipping hazard on the floor or damage nearby objects. Wiping it away ensures a clean work area and prevents dirt or debris from sticking to the springs, maximizing the effectiveness of your maintenance.
Use a cloth to remove any drips or overspray
Prevent lubricant from dripping onto the floor or nearby objects
Recommended Lubricants for Garage Door Springs
| Lubricant Type | Best Use | Pros | Cons |
|---|---|---|---|
| Silicone Spray | Torsion & extension springs | Clean, long-lasting, water-resistant | Slightly higher cost |
| White Lithium Grease | Torsion & extension springs | Thick, durable, excellent friction control | Can attract dust if over-applied |
| Garage Door Lubricant | All springs & hardware | Engineered for garage doors | Less widely available |
| WD-40 | Cleaning only | Removes rust and dirt quickly | Not suitable for lubrication |
Safety Tips When Lubricating Springs
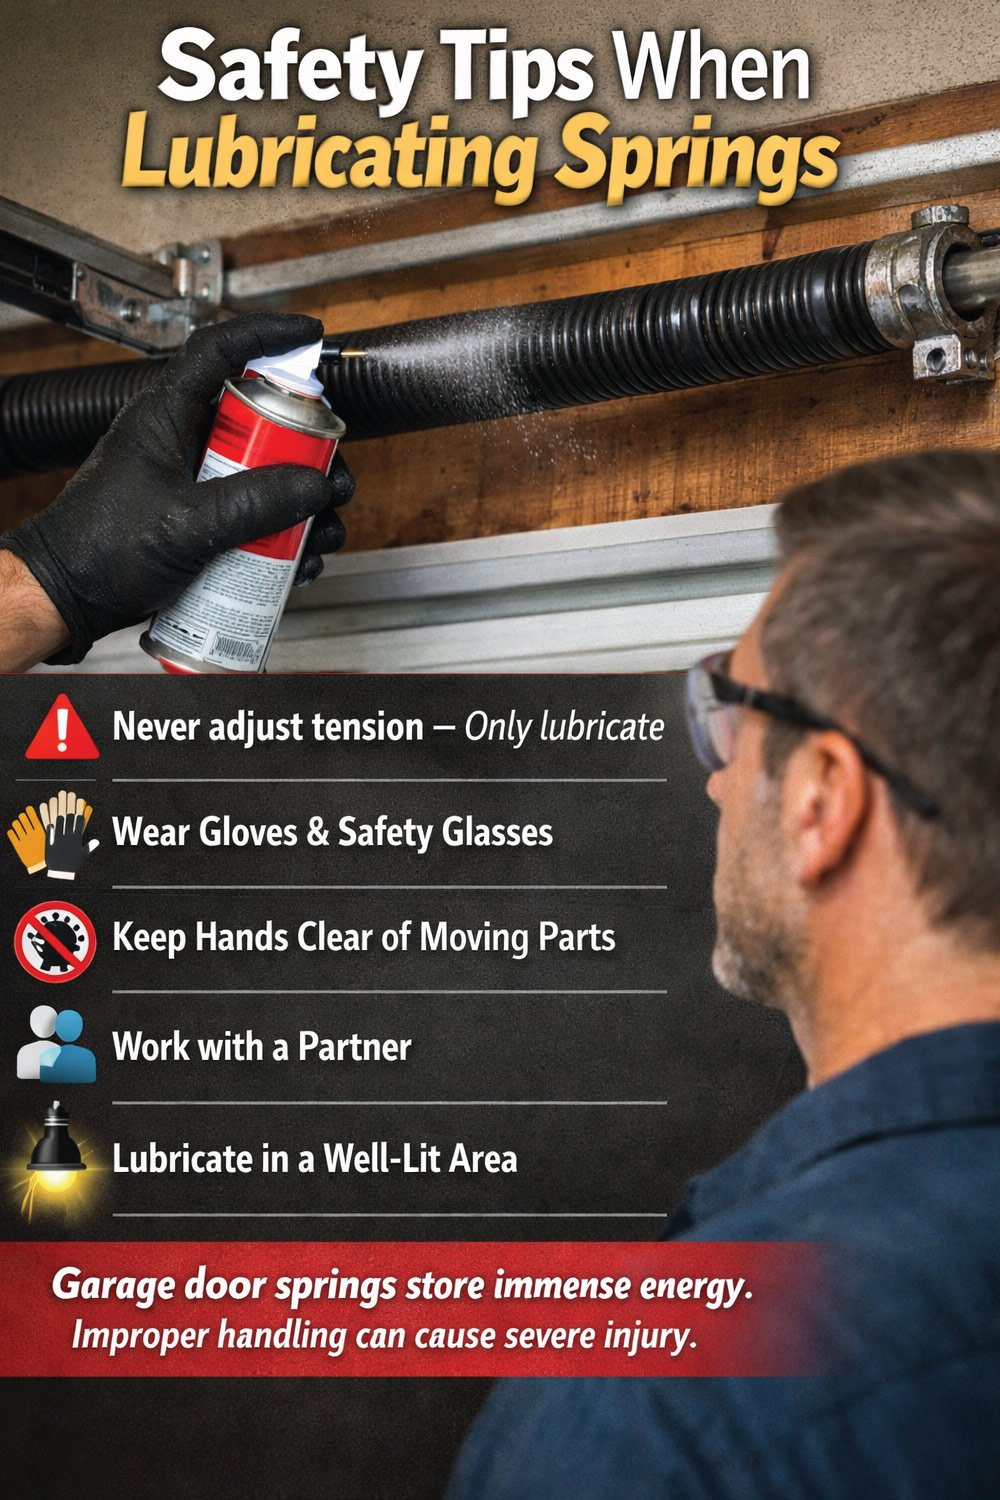
Never attempt to adjust tension – only lubricate
Use protective gear – gloves and safety glasses are essential
Keep hands clear of moving parts when testing the door
Work with a partner if possible – extra eyes for safety
Lubricate in a well-lit area to spot rust or wear
Garage door springs store immense energy. Improper handling can cause severe injury.
How Often Should Garage Door Springs Be Lubricated?
Regular lubrication keeps garage door springs operating safely, quietly, and efficiently. The ideal frequency depends on usage levels and environmental conditions. Following a proper schedule helps reduce wear, prevent noise, and extend the overall lifespan of your garage door system.
1- Every 6 Months
For most households, lubricating garage door springs every six months is ideal. This routine maintenance helps reduce friction, prevents rust buildup, and ensures smooth operation. It’s a simple schedule that keeps your garage door working reliably year-round without major issues.
2- Every 3–4 Months
If your garage door is used frequently or exposed to humid conditions, lubrication should be done every 3–4 months. Moisture and constant movement increase wear on springs, so more frequent care helps maintain performance and prevents premature damage.
3- Once a Year
For garages with light usage and stable weather conditions, lubrication once a year may be enough. Even with minimal use, regular maintenance is important to prevent rust, stiffness, and unexpected spring issues over time.
Why Regular Lubrication Matters
Consistent lubrication reduces squeaking, minimizes friction, and significantly extends spring life. Proper care can add years to your garage door system’s performance, saving you from costly repairs and ensuring safe, smooth daily operation.
Garage Door Spring Maintenance Checklist
| Task | Frequency | Action |
|---|---|---|
| Inspect for rust & wear | Every 6 months | Wipe and examine coils |
| Lubricate torsion springs | Every 6 months | Use silicone or lithium grease |
| Lubricate extension springs | Every 6 months | Apply along entire coil |
| Check for frayed cables | Every 3–6 months | Replace damaged cables immediately |
| Listen for noise | Every operation | Identify squeaks early |
Common Mistakes to Avoid
Proper garage door spring lubrication can greatly improve performance, but simple mistakes can reduce its effectiveness or even create safety risks. Avoiding these errors ensures smoother operation, longer spring life, and a safer garage door system overall.
1- Using WD-40 as a Lubricant
One of the most common mistakes is using WD-40 for lubrication. While it can clean and remove rust, it does not provide long-lasting lubrication. Relying on it alone leads to dry springs and increased friction over time.
2- Lubricating Without Cleaning First
Applying lubricant over dirt, dust, or old grease reduces its effectiveness. Always clean the springs first to remove buildup. A clean surface allows proper penetration, ensuring smoother movement and better protection against wear.
3- Over-Lubricating the Springs
Using too much lubricant can attract dust and debris, causing sticky buildup. Excess product may also drip onto the garage floor. A light, even coat is enough to keep springs functioning smoothly without creating mess or performance issues.
4- Ignoring Signs of Damage
Rust, frayed cables, or worn springs should never be ignored. These issues indicate potential failure and require professional attention. Lubrication cannot fix damaged parts, so timely inspection and repair are essential for safe garage door operation. Proper maintenance prevents accidents and ensures long-lasting performance.
Also Read: 👉 How to Lubricate Garage Door Hinges for Quiet Operation is your complete guide to reducing noise and improving performance. Learn simple steps, best lubricants, and expert tips to keep your garage door running smoothly. Don’t miss the full guide—read now and make your door quieter, safer, and long-lasting today!
When to Call a Professional
Broken or bent springs
Frayed or broken extension cables
Door coming off track
Loud grinding noises despite lubrication
Torsion spring needing adjustment
Professionals have the proper tools and experience to handle spring tension safely.
Final Thoughts
Lubricating garage door springs is one of the simplest ways to ensure smooth, quiet, and safe operation. By using the right lubricant, following safety steps, and checking springs regularly, you can prevent costly repairs, reduce noise, and extend the lifespan of your garage door system.
Remember: lubrication is safe DIY, tension adjustments are not. Treat your springs with care, and they’ll keep your garage door moving reliably for years.

Engineer Ali Hasan is a garage door expert and the founder of FixFasty. With over 16 years of experience in mechanical systems and home maintenance, he provides practical, step-by-step guides on garage door installation, repairs, and maintenance, helping homeowners keep their garage doors safe, reliable, and long-lasting.