
Garage door rollers play a critical role in smooth, balanced, and safe door operation. Worn or damaged rollers can cause noise, jerky movements, misalignment, or even prevent the door from opening.
This guide explains why rollers matter, how to identify wear, choose the right type, replace them safely, and maintain them for long-lasting, quiet, and reliable garage door performance.
Why Garage Door Rollers Matter
Garage door rollers may be small, but they play a vital role in smooth, balanced, and safe door operation. Worn or damaged rollers can cause squeaking, jerky movements, misalignment, or even prevent the door from opening.
Regular inspection and timely replacement protect tracks, hinges, and the opener, ensuring quiet, reliable, and efficient garage door performance.
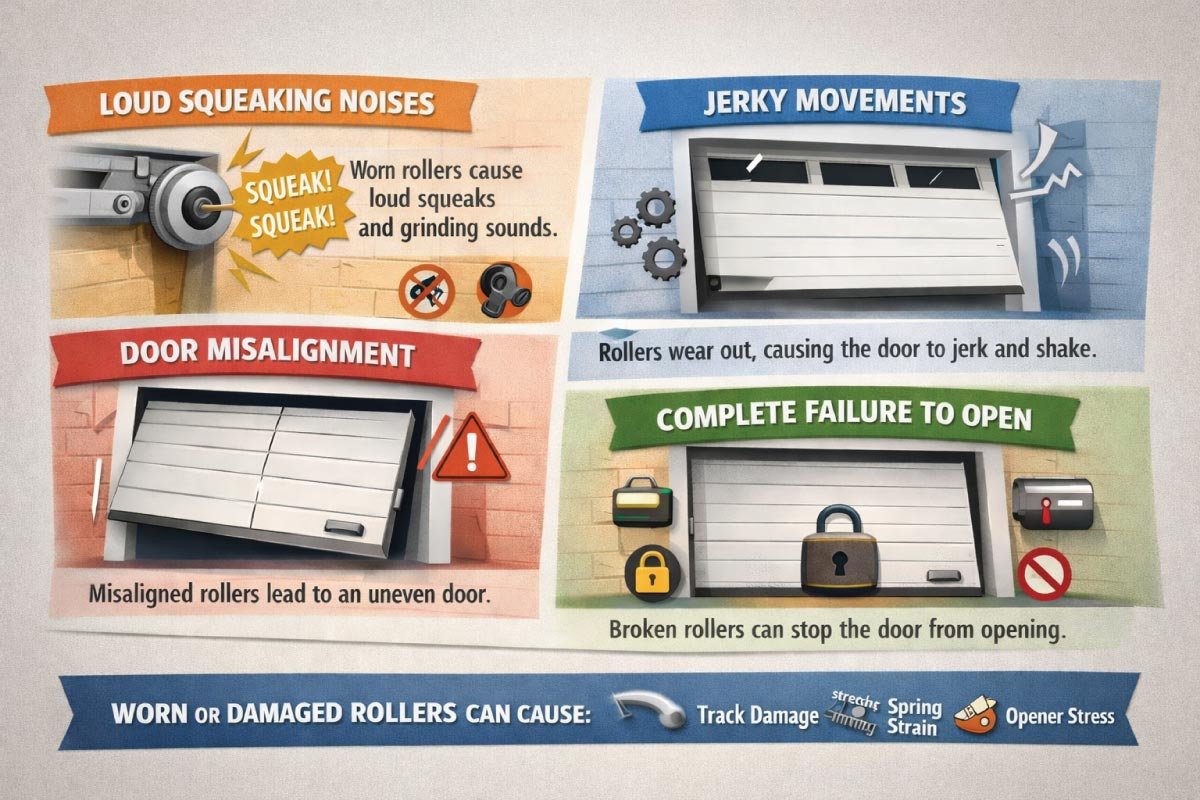
1- Loud Squeaking Noises
Worn rollers often cause loud squeaks or grinding sounds as the door moves. This indicates failing bearings or debris. Timely replacement restores quiet, smooth operation and prevents damage to tracks and components.
2- Jerky Movements
Damaged rollers can make the garage door move unevenly or jerk during operation. This increases wear on the opener and makes manual operation harder. Addressing jerky movement early ensures balanced, smooth, and safe door function.
3- Door Misalignment
Uneven or damaged rollers can misalign the garage door, causing it to stick, tilt, or fail to close fully. Proper rollers maintain alignment with the tracks, ensuring smooth operation and protecting the door’s structural integrity.
4- Complete Failure to Open
Severely worn or broken rollers can prevent the garage door from opening at all. A single seized roller may stop movement entirely. Regular inspection and replacement maintain safe, reliable, and functional door operation.
Signs You Need Garage Door Roller Replacement
Garage door rollers endure constant stress while guiding the door along tracks, and over time, they can wear out. Early recognition of issues prevents costly damage, improves safety, and ensures smooth, efficient operation through regular inspection and maintenance.
| Sign | Description | Risk if Ignored | Recommended Action |
|---|---|---|---|
| Loud Noises | Screeching, grinding, or rattling sounds when opening/closing | Damage to tracks or hinges | Inspect rollers, clean, lubricate, or replace |
| Jerky Movement | Door moves unevenly or sticks halfway | Door imbalance or spring strain | Check roller condition and alignment |
| Visible Wear | Cracks, flat spots, or worn bearings | Roller failure | Immediate replacement |
| Door Misalignment | Door tilts or drags along track | Increased wear on opener | Replace rollers and adjust tracks |
| Slow Operation | Door opens/closes slowly | Strain on motor | Lubricate and replace rollers as needed |
Types of Garage Door Rollers
Before replacing rollers, it’s important to know the type on your door. Choosing the wrong material or size can cause noise, premature wear, or track and opener damage. Understanding steel, nylon, and plastic rollers ensures durable, quiet, and smooth operation.

1- Steel Rollers
Steel rollers are highly durable and ideal for heavy or high-traffic garage doors. They withstand frequent use but can be noisy if not lubricated. Regular maintenance ensures smooth, long-lasting operation.
2- Nylon Rollers
Nylon rollers are quieter and smoother than steel, making them ideal for residential doors. They reduce vibration, extend track life, and are durable for daily use, though they may not suit very heavy doors.
3- Plastic Rollers
Plastic rollers are lightweight and inexpensive, suitable for light residential doors. They wear faster than steel or nylon, can create noise and friction, and require more frequent replacement for smooth operation.
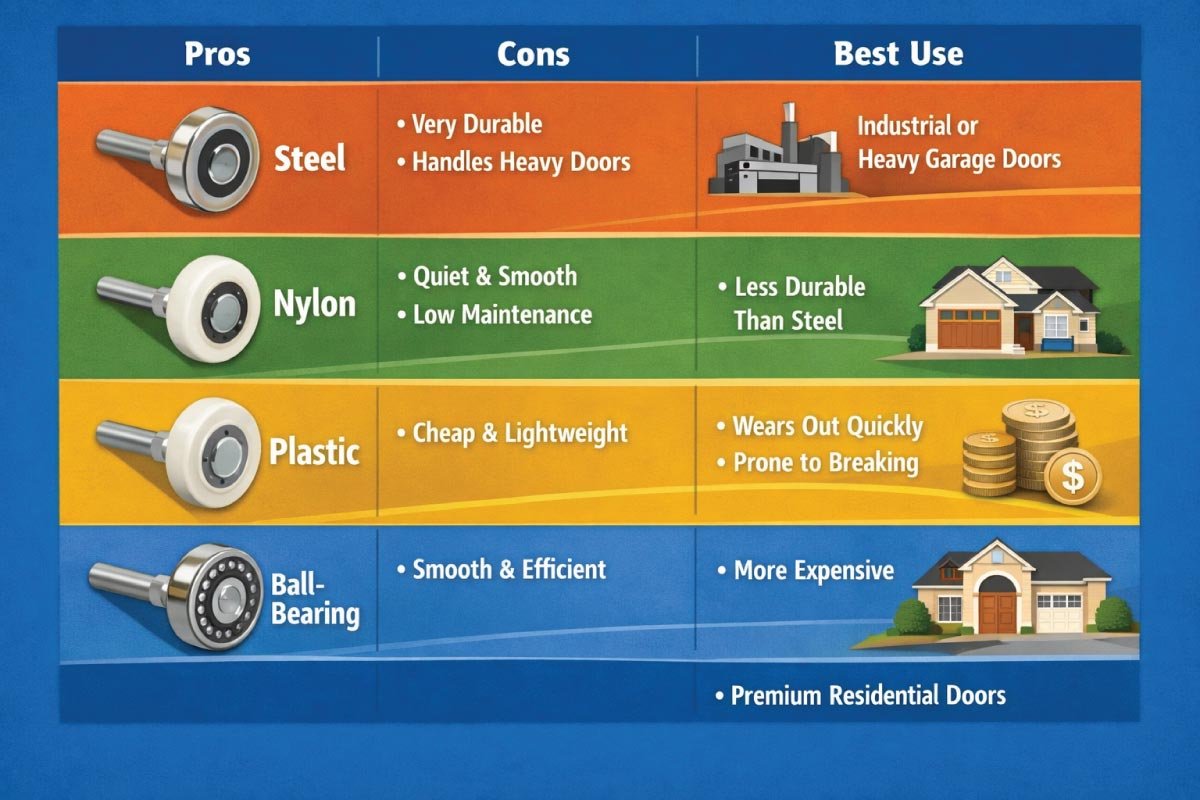
Roller Types and Their Pros & Cons
Selecting the correct garage door rollers is essential for smooth, quiet, and reliable operation. Knowing the advantages, disadvantages, and best applications of each type helps homeowners reduce noise, minimize wear, and ensure long-lasting performance.
| Roller Type | Pros | Cons | Best Use |
|---|---|---|---|
| Steel | Very durable, handles heavy doors | Noisy, requires lubrication | Industrial or heavy garage doors |
| Nylon | Quiet, smooth operation, low maintenance | Less durable than steel | Residential doors |
| Plastic | Cheap, lightweight | Wears out quickly, prone to breaking | Temporary or budget solutions |
| Ball-Bearing | Smooth and efficient | More expensive | Premium residential doors |
Tools Needed for Garage Door Roller Replacement
Wrench set or socket set
Screwdriver (Phillips or flathead depending on rollers)
Pliers
Hammer or rubber mallet
Lubricant (silicone or lithium grease)
Safety gloves and glasses
Step-by-Step Guide to Replacing Garage Door Rollers Safely
Replacing worn garage door rollers restores smooth, quiet operation and extends the door system’s lifespan.
Following a step-by-step process from disconnecting the opener to testing, ensures safe, efficient replacement while protecting tracks and hinges.
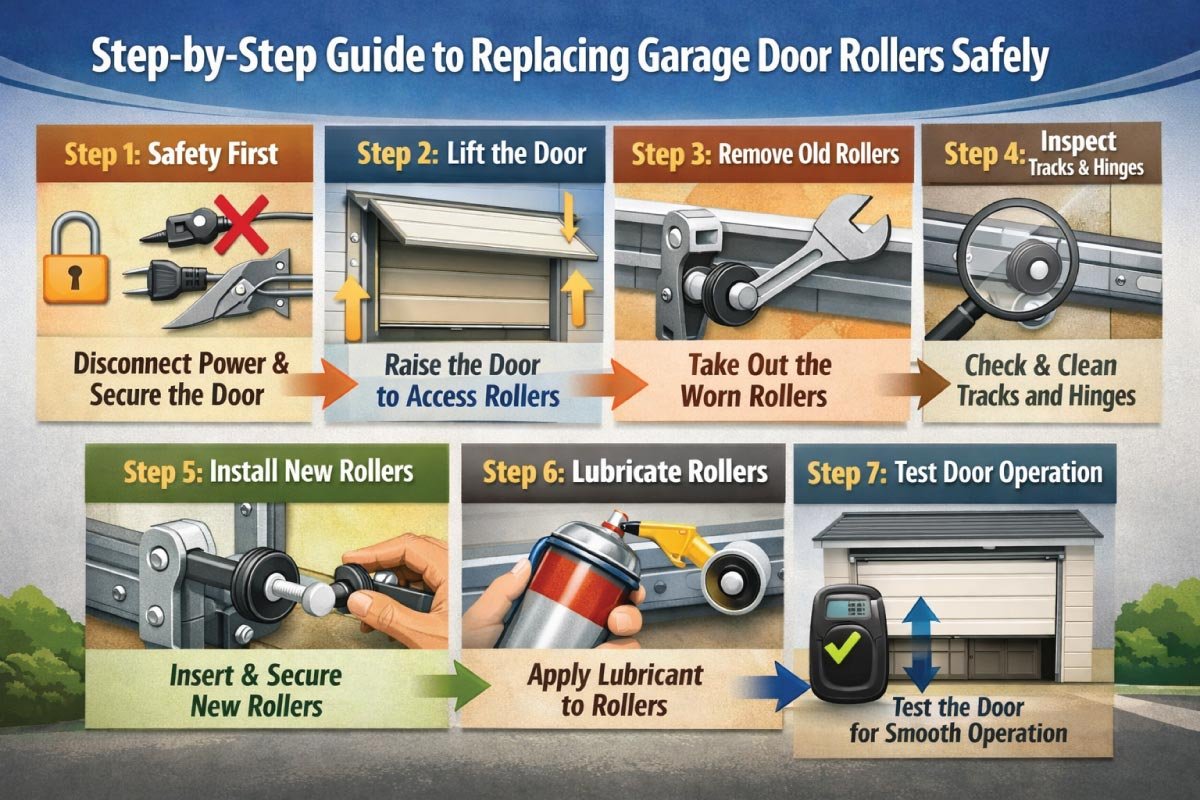
Step 1: Safety First
Before starting any work, ensure maximum safety by disconnecting the garage door opener from the power source. This prevents accidental activation while you are working.
Use clamps or locking pliers to secure the door firmly in place so it does not move unexpectedly.
Garage doors are heavy and can be dangerous, so taking proper safety precautions at the beginning is essential for a safe and successful roller replacement process.
Step 2: Lift the Door
Carefully lift the garage door manually to gain full access to the rollers and tracks. Make sure the door is evenly supported on both sides to avoid bending, tilting, or misalignment.
Proper positioning is very important to maintain stability while working. If needed, ask for assistance to hold the door securely.
A stable setup ensures you can safely remove and install rollers without putting stress on the door system or hardware.
Step 3: Remove Old Rollers
Using a wrench or socket set, carefully unbolt the old rollers from the hinges. Slide them out slowly to avoid damaging the tracks or surrounding hardware.
Take your time during removal, as forcing the rollers can cause misalignment or scratches.
While removing, inspect the old rollers for signs of wear, cracks, or damage, as this can help identify deeper alignment or maintenance issues within the garage door system.
Step 4: Inspect Tracks and Hinges
Before installing new rollers, carefully inspect the tracks and hinges for any bends, rust, dirt, or debris buildup. Clean the surfaces thoroughly to ensure smooth movement of the new rollers.
Tighten any loose screws or bolts to maintain proper alignment. Damaged or dirty tracks can cause future problems, so ensuring everything is in good condition helps improve performance and extends the lifespan of your garage door system.
Step 5: Install New Rollers
Insert each new roller carefully into the track and attach it securely to the hinge using bolts or screws. Make sure each roller is properly aligned and firmly fixed to avoid wobbling or uneven movement.
A snug fit is important to ensure smooth operation and reduce stress on the garage door opener.
Proper installation helps prevent sticking, noise, and long-term damage to the door system or tracks.
Step 6: Lubricate Rollers
Apply a high-quality silicone or lithium-based grease to the roller bearings for smooth and quiet operation.
Lubrication reduces friction between moving parts, helping the door operate more efficiently. It also prevents squeaking noises and extends the lifespan of both rollers and tracks.
Avoid using heavy oils or grease that attract dust and dirt, as this can lead to buildup and reduce overall performance over time.
Step 7: Test Door Operation
Once everything is installed, reconnect the garage door opener and test the door by operating it fully. Observe its movement carefully to ensure it opens and closes smoothly, quietly, and without resistance.
If you notice sticking, uneven movement, or tilting, recheck the roller installation, alignment, and lubrication. Proper testing ensures that the system is safe, reliable, and functioning correctly before normal daily use.
👉 How to Fix Garage Door Sensor: Complete Guide helps you quickly identify and solve common sensor problems. Learn easy troubleshooting steps to restore proper garage door function and improve safety. Read the full post to get complete guidance and fix your garage door sensor like a professional without any confusion.
Garage Door Roller Replacement
| Step | Action | Purpose | Tools Needed | Pro Tip |
|---|---|---|---|---|
| 1 | Safety First | Prevent accidental door movement and injury | Clamps/locking pliers, disconnect opener | Always unplug the opener before starting |
| 2 | Lift the Door | Access rollers safely | None (manual lifting) | Support evenly to avoid bending the door |
| 3 | Remove Old Rollers | Clear worn rollers from hinges | Wrench/socket set, screwdriver | Inspect for unusual wear or damage |
| 4 | Install New Rollers | Ensure smooth and secure operation | Wrench/socket set, bolts/screws | Don’t overtighten bolts; rollers should spin freely |
| 5 | Lubricate & Test | Reduce friction and verify smooth operation | Silicone or lithium grease | Test door manually and with opener before finishing |
Common Roller Replacement Mistakes
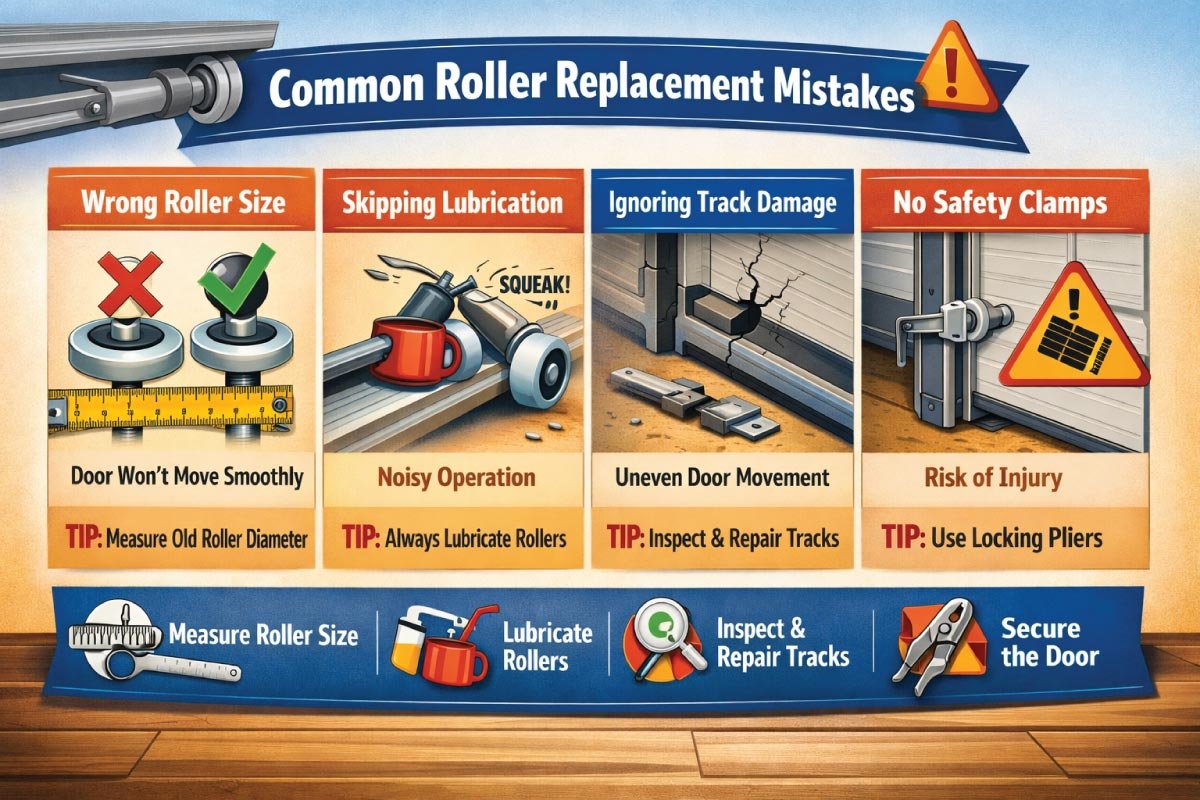
| Mistake | Consequence | How to Avoid |
|---|---|---|
| Using the wrong roller size | Door won’t move smoothly, may damage tracks | Measure old roller diameter before purchase |
| Skipping lubrication | Noisy operation, premature wear | Always lubricate new rollers |
| Ignoring track damage | Rollers wear quickly, uneven door movement | Inspect and repair tracks before installing rollers |
| DIY without safety clamps | Door may fall, serious injury | Use locking pliers or clamps to secure door |
👉 Garage Door Cable Repair: Step-by-Step Guide is a complete resource to help you understand how to safely fix and replace garage door cables. Learn easy, step-by-step instructions to avoid damage and ensure smooth operation. Read the full post to master the repair process and keep your garage door working safely and efficiently.
Maintenance Tips for Longer-Lasting Rollers
Replacing rollers restores smooth operation, but ongoing maintenance is essential. Regular inspections, lubrication, and track care prevent premature wear, reduce noise, and protect hinges and the opener, ensuring efficient, long-lasting garage door performance.
Lubricate regularly: Every 6 months, apply grease to rollers, hinges, and tracks
Clean tracks: Remove debris, dust, or rust to prevent roller damage
Check alignment: Ensure tracks and hinges are aligned to avoid uneven wear
Inspect rollers: Look for cracks, flat spots, or wobbling
Test door balance: A properly balanced door reduces strain on rollers and opener
Roller Maintenance Schedule
Regular maintenance keeps garage door rollers smooth and extends their lifespan. Consistent inspections prevent wear, reduce noise, and ensure safe, reliable operation. The table below lists key tasks, frequency, and tips for efficient year-round performance.
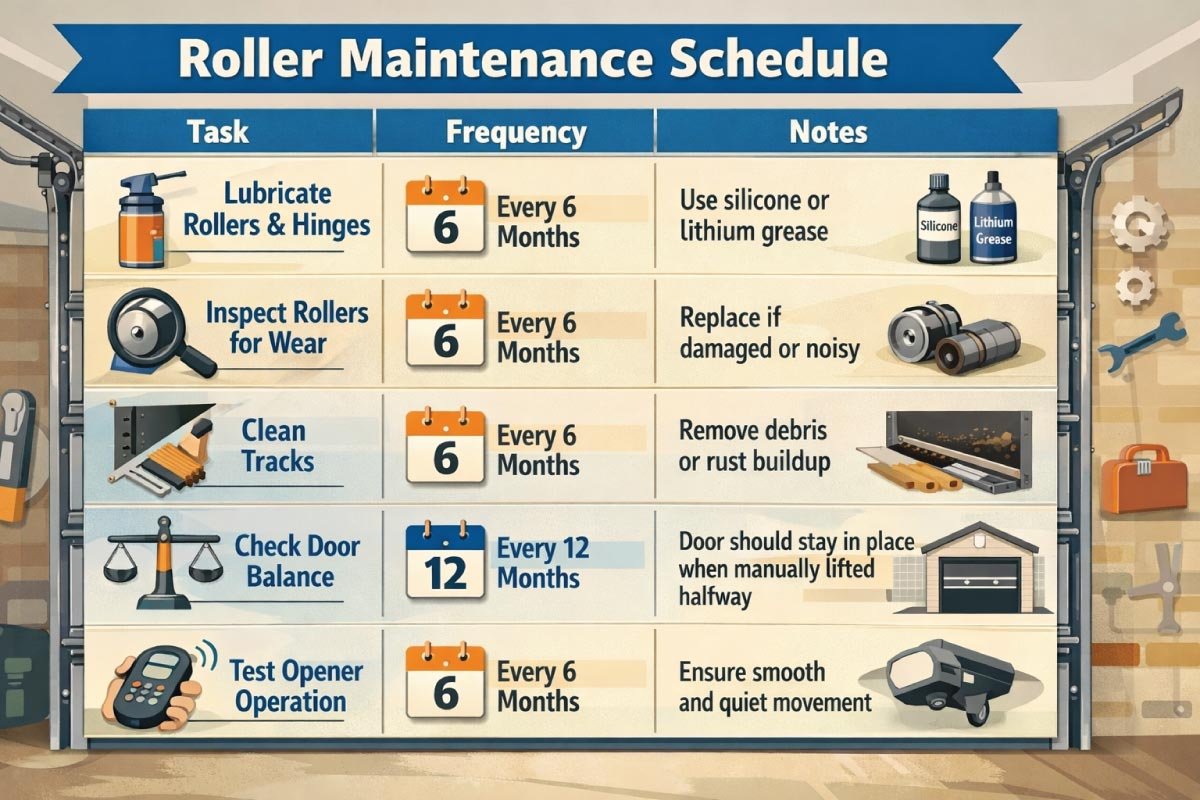
| Task | Frequency | Notes |
|---|---|---|
| Lubricate rollers & hinges | Every 6 months | Use silicone or lithium grease |
| Inspect rollers for wear | Every 6 months | Replace if damaged or noisy |
| Clean tracks | Every 6 months | Remove debris or rust buildup |
| Check door balance | Every 12 months | Door should stay in place when manually lifted halfway |
| Test opener operation | Every 6 months | Ensure smooth and quiet movement |
When to Call a Professional
DIY roller replacement is dangerous with broken or high-tension springs. Professionals handle them safely every time.
Heavy-duty or commercial doors have intricate roller and track systems requiring proper professional installation for safety.
Large doors strain rollers, tracks, and openers, making DIY replacement risky, physically demanding, and potentially unsafe.
Replacing rollers alone won’t fix damaged tracks, hinges, or panels; professionals ensure smooth, reliable door operation.
Licensed technicians reduce risk, ensure proper installation, and guarantee safe, long-lasting garage door performance for homeowners.
Conclusion
Replacing garage door rollers can be simple with the right tools, knowledge, and safety precautions. Choosing the correct roller type, performing maintenance, and calling a professional when needed helps ensure smooth, quiet, and long-lasting operation.
Following this guide keeps your garage door gliding effortlessly, reduces strain on the opener, and extends the system’s lifespan. Don’t let a noisy or jerky door disrupt your day—replace worn rollers to maintain safety, efficiency, and reliability.
👉 How to Align Garage Door Sensors is a simple yet important guide for fixing common garage door issues. Learn step-by-step methods to properly adjust and align sensors for safe and smooth operation. Read the full post to understand the complete process and avoid future problems with your garage door system.

Engineer Ali Hasan is a garage door expert and the founder of FixFasty. With over 16 years of experience in mechanical systems and home maintenance, he provides practical, step-by-step guides on garage door installation, repairs, and maintenance, helping homeowners keep their garage doors safe, reliable, and long-lasting.