
Garage door safety sensors are small components, but they play a huge role in keeping people, pets, and property safe. If your garage door refuses to close, reverses unexpectedly, or the sensor lights are blinking or off, faulty sensor wiring is often the culprit. Knowing how to test garage door sensor wires can save you time, money, and frustration and help you decide whether the issue is a simple fix or something that requires professional help.
This guide walks you through everything you need to know, from understanding how sensor wires work to testing them with basic tools and troubleshooting common problems.
Understanding Garage Door Safety Sensor Wires
Garage door safety sensors—often called photo-eye sensors—play a critical role in preventing accidents and protecting property. Installed near the bottom of the door tracks, they work together to detect obstacles during operation and stop the door from closing when something blocks their path.
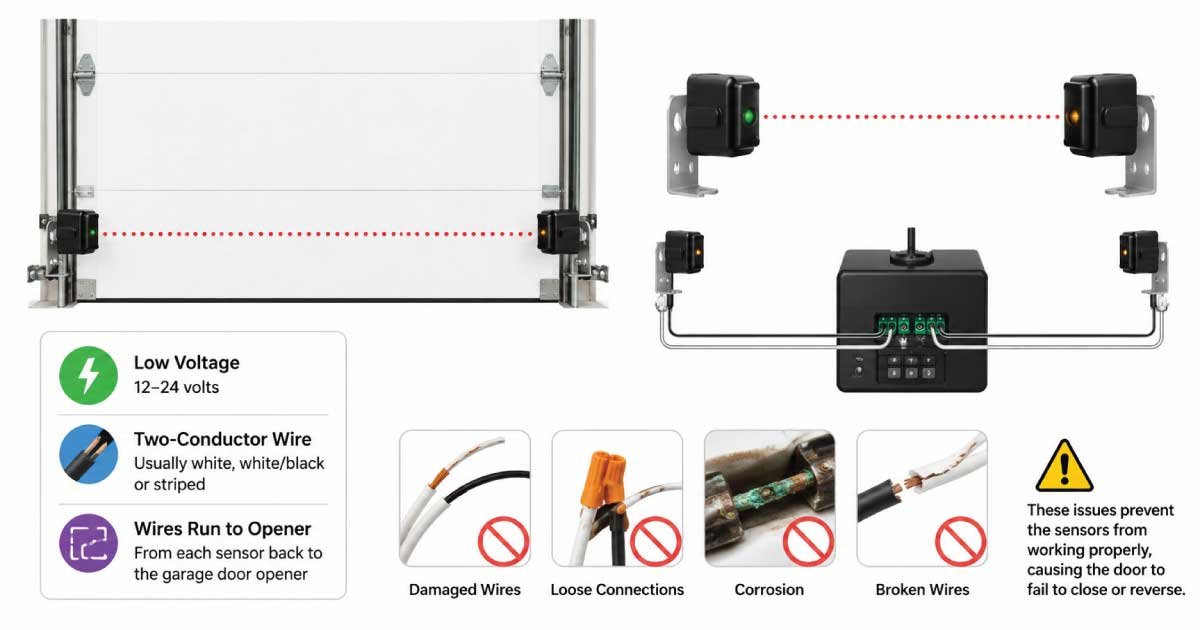
Garage door safety sensors also called photo-eye sensors are installed near the bottom of each side of the garage door track. One sensor sends an invisible infrared beam, and the other receives it. If anything interrupts that beam while the door is closing, the door automatically stops or reverses.
The sensor wires are what allow these devices to communicate with the garage door opener. Typically:
- The wires are low-voltage (usually 12–24 volts)
- They run from each sensor back to the opener motor unit
- Most systems use two-conductor wires (often white, white/black, or striped)
When these wires are damaged, loose, corroded, or broken, the sensors can’t function correctly even if the sensors themselves are perfectly fine.
Common Signs of Sensor Wire Problems
Garage door wiring issues often reveal themselves through unusual or inconsistent door behavior. Recognizing these warning signs early can help prevent safety risks and avoid unnecessary repairs. Many symptoms that appear to be sensor failures are actually caused by damaged or disconnected wires.
Before testing anything, it helps to recognize symptoms that often point to wiring issues:
- Garage door won’t close unless you hold the wall button
- Door starts closing, then reverses immediately
- Sensor LED lights are off or flickering
- One sensor light is on while the other is off
- Door works intermittently for no obvious reason
While misalignment and dirty lenses are common issues, wiring problems are just as frequent especially in garages with exposed wires.
Tools You will Need to Test Sensor Wires
Testing garage door sensor wires does not require specialized training or expensive equipment. With a few basic tools, most homeowners can safely diagnose common wiring issues. Having the right tools ready makes the process faster, safer, and far more accurate.
You do not need professional equipment to test garage door sensor wires. Most homeowners can do it with basic tools:
- Digital multimeter (with continuity and voltage settings)
- Flathead or Phillips screwdriver
- Wire strippers (optional)
- Electrical tape or wire connectors
- Flashlight
- Safety gloves
A multimeter is the most important tool. Even an inexpensive one is more than enough for low-voltage garage door wiring.
Safety Precautions Before You Begin
Even though garage door sensor wiring operates at low voltage, taking proper safety precautions is essential before starting any inspection or testing. Simple preventive steps reduce the risk of equipment damage, electrical shorts, or accidental door movement while you work around the opener and wiring.
Although garage door sensor wires carry low voltage, you should still follow basic safety rules:
- Unplug the garage door opener from the power outlet.
- Avoid touching exposed copper wire with bare hands.
- Keep children and pets away while testing.
- Never work on wiring while the opener is plugged in.
Low voltage doesn’t usually cause injury, but it can damage your opener or sensors if mishandled.
Step 1: Inspect the Sensor Wires Visually
Begin with a careful visual inspection before using any tools or testing equipment. Many garage door sensor wiring issues can be identified simply by looking closely at the wire condition and connection points. Physical damage is often the most common and easiest problem to detect.
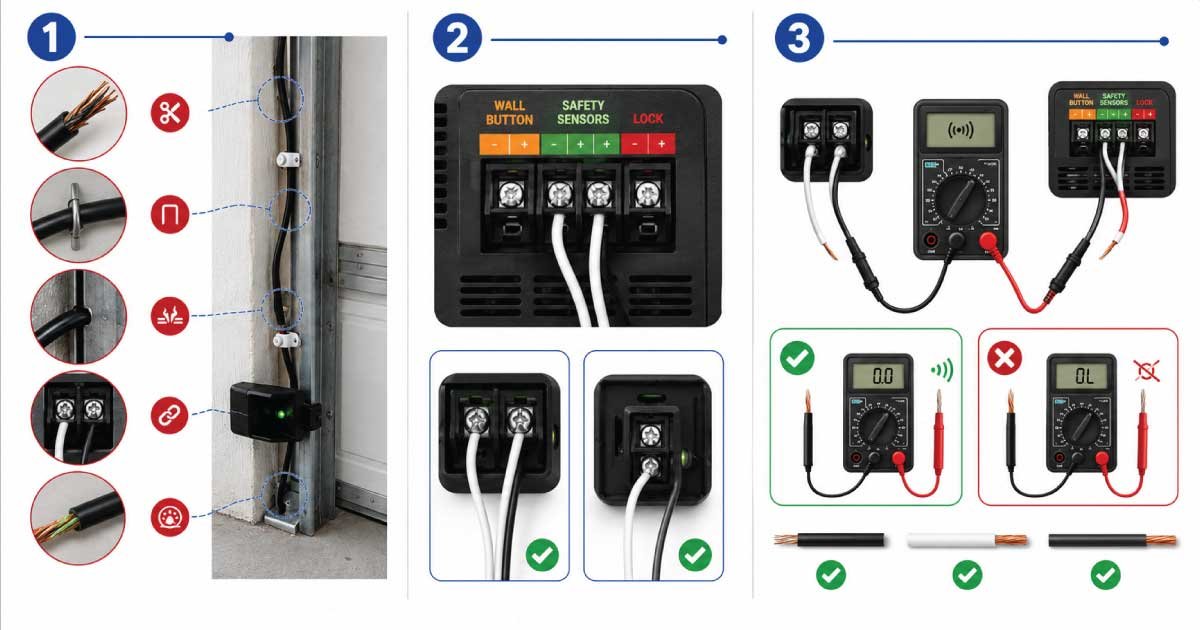
Start with a simple visual inspection. Many wiring problems are obvious once you know what to look for.
Check for:
- Frayed or cut insulation
- Staples driven too tightly into the wire
- Crushed wires near the track or wall
- Loose connections at the sensor terminals
- Corrosion on exposed copper
Pay special attention to the lower portion of the wires near the floor. These areas are most vulnerable to damage from tools, bikes, lawn equipment, moisture, and pests.
If you find obvious damage, you may not need further testing—repairing or replacing the wire may solve the issue.
Step 2: Check Sensor Wire Connections
After confirming the wires appear physically intact, the next step is to examine all connection points. Even slightly loose or poorly seated wires can interrupt sensor communication. Connection issues are common because vibration, temperature changes, and minor impacts can gradually loosen terminals over time.
Loose or improperly seated wires are a common cause of sensor failure.
- Locate the terminals on the back of the garage door opener.
- Identify the sensor wire terminals (usually labeled).
- Make sure each wire is firmly inserted and secured.
- Check the sensor end as well—each wire should be tightly connected to its terminal.
If a wire easily pulls out or feels loose, reinsert it properly and test the door again before moving on.
Step 3: Test for Continuity (Broken Wire Test)
If visual inspection and connection checks don’t reveal the problem, continuity testing helps uncover hidden wire damage. This test determines whether electricity can travel through the wire uninterrupted. It is especially useful for detecting internal breaks that aren’t visible from the outside.
Continuity testing tells you whether electricity can flow through the wire from one end to the other. This is the most important test for detecting breaks inside the insulation.
How to Test Continuity
- Set your multimeter to continuity mode (often marked with a sound wave symbol).
- Disconnect the sensor wires from both the sensor and the opener.
- Place one multimeter probe on one end of the wire.
- Place the other probe on the opposite end of the same wire.
Interpreting Results
- Beep or near-zero resistance: The wire is continuous and likely intact.
- No beep or infinite resistance: The wire is broken internally.
Repeat this test for each conductor. If either wire fails the continuity test, it must be repaired or replaced.
Step 4: Test Sensor Wire Voltage
If continuity testing confirms the wires are intact but the sensors still fail to operate, voltage testing is the next logical step. This process verifies whether the garage door opener is supplying adequate power to the sensors and helps pinpoint issues related to the opener board or weakened wiring.
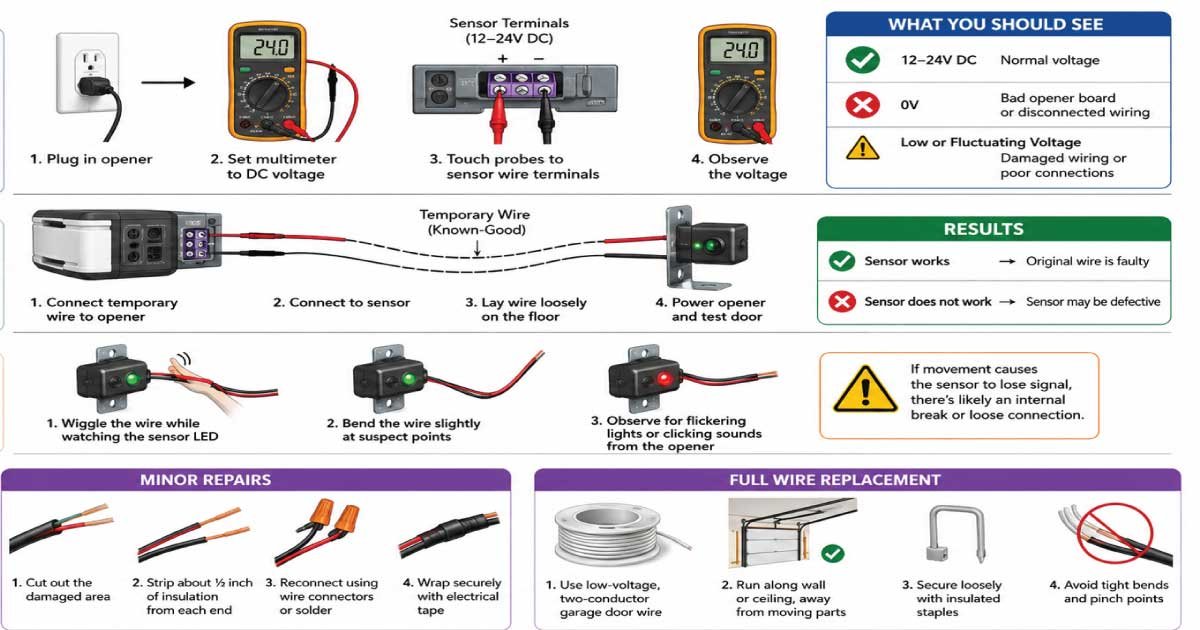
If the wires are continuous but the sensors still don’t work, the next step is checking voltage.
How to Test Voltage
- Plug the garage door opener back in.
- Set your multimeter to DC voltage (20–50V range).
- Carefully touch the probes to the sensor wire terminals at the opener.
- Observe the voltage reading.
What You Should See
Most garage door systems supply 12–24 volts DC to the sensors. The exact value varies by model, but:
- No voltage suggests a bad opener board or disconnected wiring.
- Low or fluctuating voltage may indicate damaged wiring or poor connections.
If voltage is present at the opener but not at the sensor end, the wire is likely damaged somewhere along the run.
Step 5: Isolate the Problem Using a Temporary Wire
When test results are unclear, isolating the wiring from the sensor itself can quickly narrow down the source of the issue. Using a temporary wire bypass allows you to determine whether the original wire run is faulty or if the sensor hardware has failed.
When you’re unsure whether the issue is the wire or the sensor, a temporary bypass test can help.
How to Do It
- Use a short length of known-good wire.
- Connect it directly from the opener terminal to the sensor.
- Lay it loosely on the floor (do not staple or secure it yet).
- Power the opener and test the door.
Results
- If the sensor works with the temporary wire, the original wire is faulty.
- If it still doesn’t work, the sensor itself may be defective.
This method is especially helpful when wires are hidden behind walls or ceilings.
📖 Continue Reading: Expert Garage Door Advice ➜ How to Align Garage Door Sensors: Complete Guide
Step 6: Check for Intermittent Wiring Issues
Some sensor wire problems are not constant and only appear when the wire is moved, bent, or vibrated. These intermittent faults can be frustrating to diagnose, but careful observation during movement testing often reveals internal breaks or loose connections.
Some wiring problems only appear when the wire is moved or stressed.
To test for this:
- Gently wiggle the wire while watching the sensor LED
- Bend the wire slightly at suspect points
- Observe for flickering lights or clicking sounds from the opener
If movement causes the sensor to lose signal, there’s likely an internal break or loose connection.
Step 7: Repairing or Replacing Sensor Wires
Once you’ve identified damaged wiring, the final step is deciding whether to repair a small section or replace the entire wire run. Minor damage can often be fixed quickly, while severely worn or aging wires are better replaced for long-term reliability.
Minor Repairs
For small damaged sections:
- Cut out the damaged area
- Strip about ½ inch of insulation from each end
- Reconnect using wire connectors or solder
- Wrap securely with electrical tape
Full Wire Replacement
If the wire is badly damaged or very old, replacement is the better option:
- Use low-voltage, two-conductor garage door wire
- Run it along the wall or ceiling, away from moving parts
- Secure loosely with insulated staples
- Avoid tight bends and pinch points
Replacing the wire entirely often prevents future issues.
Common Mistakes to Avoid
When testing or repairing garage door sensor wires, small oversights can lead to incorrect conclusions or even cause new problems. Being aware of common mistakes helps ensure accurate troubleshooting, prevents unnecessary part replacements, and reduces the risk of damaging wiring or opener components during the process.
- Testing voltage with the opener unplugged
- Mixing up sensor wires on the terminals
- Stapling wires too tightly
- Ignoring corrosion at connections
- Assuming blinking lights always mean bad sensors
Many “bad sensor” diagnoses turn out to be wiring problems that were overlooked.
📖 Continue Reading: Expert Garage Door Advice ➜ How to Lubricate a Garage Door Properly (Quick Guide)
When to Call a Professional
While many sensor wire issues can be handled by homeowners, some situations require professional expertise. Complex electrical problems, hidden wiring, or persistent failures may point to issues beyond basic troubleshooting. Knowing when to stop and call a technician can save time and prevent costly mistakes.
You should consider professional help if:
- The opener control board shows no output voltage
- Wiring runs through finished walls or ceilings
- You’re uncomfortable using a multimeter
- Problems persist after wire replacement
A technician can quickly identify whether the issue lies in the wiring, sensors, or opener electronics.
Final Thoughts
Learning how to test garage door sensor wires is a valuable skill for any homeowner. With basic tools and careful testing, you can diagnose most sensor problems without replacing expensive parts unnecessarily. In many cases, a simple continuity test or wire repair restores proper operation and keeps your garage door running safely.
By taking the time to inspect, test, and understand your sensor wiring, you not only fix today’s problem you reduce the chance of future failures. A properly wired sensor system ensures your garage door closes smoothly, safely, and reliably every time.
📖 Continue Reading: Expert Garage Door Advice ➜ How to Open a Garage Door Manually (Quick & Easy Guide)

Engineer Ali Usman is a professional garage door expert and author at FixFasty, with over 10 years of hands-on experience in garage door systems and mechanical maintenance. He writes clear, step-by-step guides on garage door repairs, parts, and safety practices, helping homeowners fix problems correctly and maintain smooth, secure, and long-lasting garage door performance.