
Garage doors make daily life more convenient, but a non-responsive opener can quickly turn that convenience into frustration. Understanding the common causes of garage door failure—and how to fix them—can save you time, money, and stress.
From checking power sources and inspecting remotes to examining springs, sensors, and the motor, this guide walks you through practical troubleshooting steps you can apply today.
Whether the issue is simple, like dead batteries, or more complex, like worn gears or misaligned tracks, knowing what to look for helps you restore smooth, reliable operation safely and efficiently.
Regular maintenance combined with careful inspection ensures your garage door stays functional, secure, and long-lasting—so you can avoid unexpected breakdowns and costly repairs.
Check the Power Source
Before panicking, ensure that your garage door opener is receiving power. Check the outlet, power cord, and circuit breaker. A tripped breaker or unplugged cord is a common culprit.
Power Source Checklist
Before assuming your garage door opener is broken, ensure it’s receiving power. Tripped breakers, unplugged cords, or dead remote batteries are common causes. Verifying the power source saves time and helps identify if the issue is electrical or mechanical.
| Step | What to Check | Why It Matters |
|---|---|---|
| 1 | Outlet | Some outlets may stop working due to tripped breakers |
| 2 | Power cord | Damaged cords prevent power delivery |
| 3 | Circuit breaker | Resetting may restore power |
| 4 | Remote batteries | Weak batteries can mimic a power issue |
Inspect the Remote Control
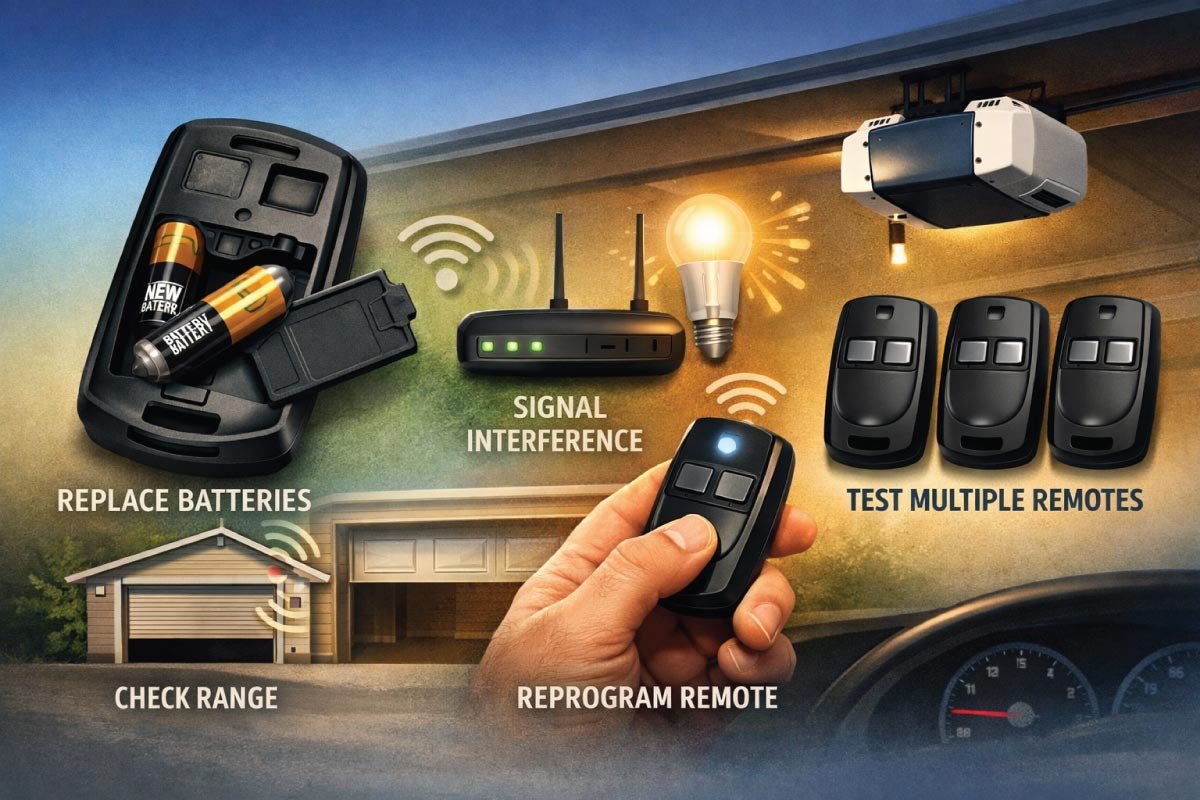
Tips for Inspecting the Remote Control:
Replace the remote batteries with fresh, high-quality ones.
Ensure the remote is within range of the opener when testing.
Check for signal interference from nearby devices such as Wi-Fi routers, LED lights, or other electronics.
Reprogram the remote according to the manufacturer’s instructions if it stops working.
Examine the Wall Switch
If the remote doesn’t work, use the wall switch to check the opener. This helps determine whether the problem lies with the remote or the opener, allowing you to address the correct component safely and reliably.
Tips for Examining the Wall Switch:
Press the wall switch to open or close the garage door.
Observe if the door moves smoothly or if there’s no response.
If the door responds, the remote may have dead batteries or require reprogramming.
Check the wiring connections behind the wall switch for loose or damaged wires.
Replace the wall switch if it shows signs of wear, corrosion, or malfunction.
Look for Obstructions
Garage doors need a clear path for smooth operation. Debris, dirt, or small objects can cause the door to stop, reverse, or move unevenly. Regularly clearing obstructions protects rollers, tracks, and the opener from damage..
Tips for Removing Obstructions:
Inspect the entire length of both tracks for dirt, stones, or small objects.
Remove toys, tools, or debris near the door’s path before operating.
Clean tracks with a dry cloth or mild detergent to remove dust and grime.
Check for cobwebs, leaves, or other debris that may accumulate over time.
Check the Safety Sensors
Modern garage doors have infrared safety sensors to prevent accidents. Misaligned, dirty, or faulty sensors can stop the door, reverse it, or prevent full opening. Regular inspection and adjustment ensure safe, reliable operation.
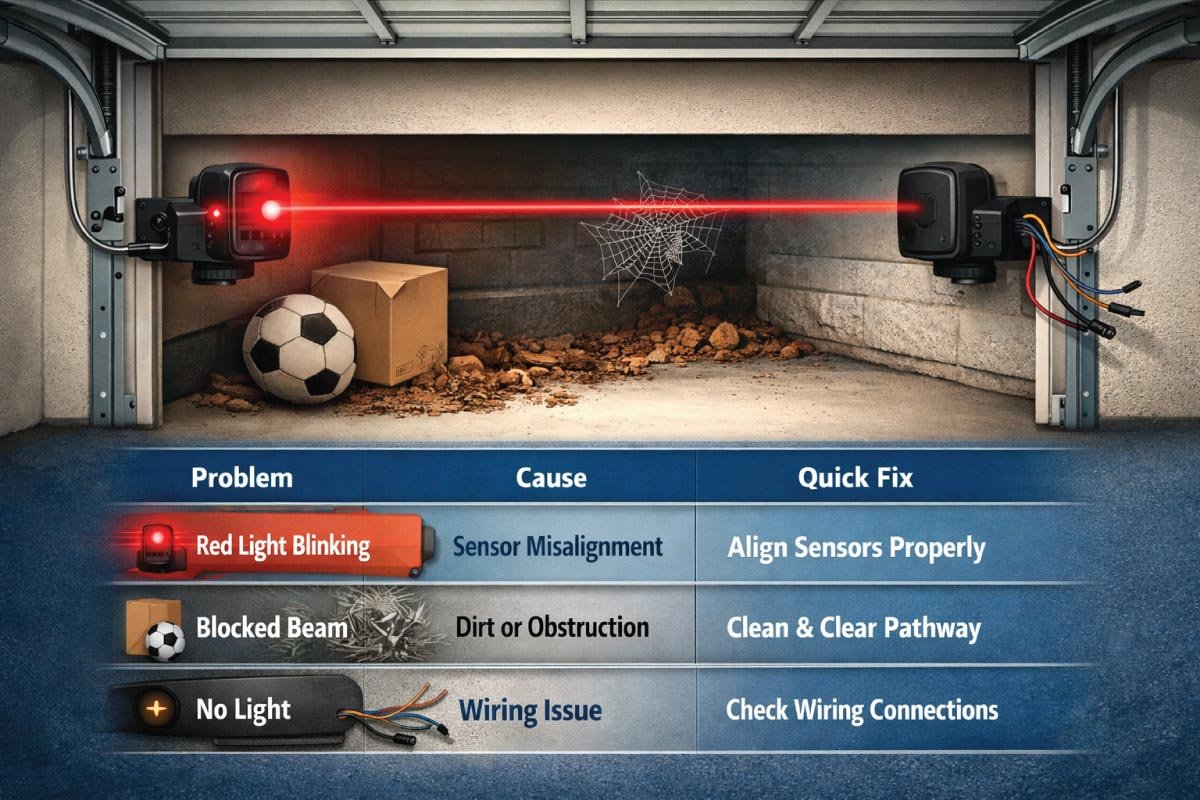
Sensor Issues and Solutions
Garage door sensors are safety features that prevent accidents, but even minor issues can stop your door from operating properly. Common problems include misaligned sensors, blocked beams, or wiring faults. Identifying the cause quickly allows for simple fixes—like realigning sensors, cleaning lenses, or checking connections—ensuring your door opens and closes safely and reliably every time.
| Problem | Cause | Quick Fix |
|---|---|---|
| Red light blinking | Sensor misalignment | Adjust sensors so they face each other |
| Blocked beam | Dirt, debris, or objects | Clean lenses and remove obstructions |
| No light | Wiring problem | Inspect wiring connections |
Test the Manual Release
Tips for Testing the Manual Release:
Locate the manual release cord, usually a red handle hanging from the opener rail.
Pull the cord to disengage the door from the opener carriage.
Lift the door manually to check for smooth movement along the tracks.
Observe any sticking, jerking, or unusual resistance that may indicate mechanical issues.
If the door moves freely, inspect the opener’s motor, gears, chain, or belt for faults.
Inspect the Tracks
Garage door tracks guide smooth door movement. Bent, dented, or misaligned tracks can cause sticking, uneven operation, or prevent full opening. Regular inspection prevents damage to rollers, hinges, and the opener, ensuring safe, reliable performance.
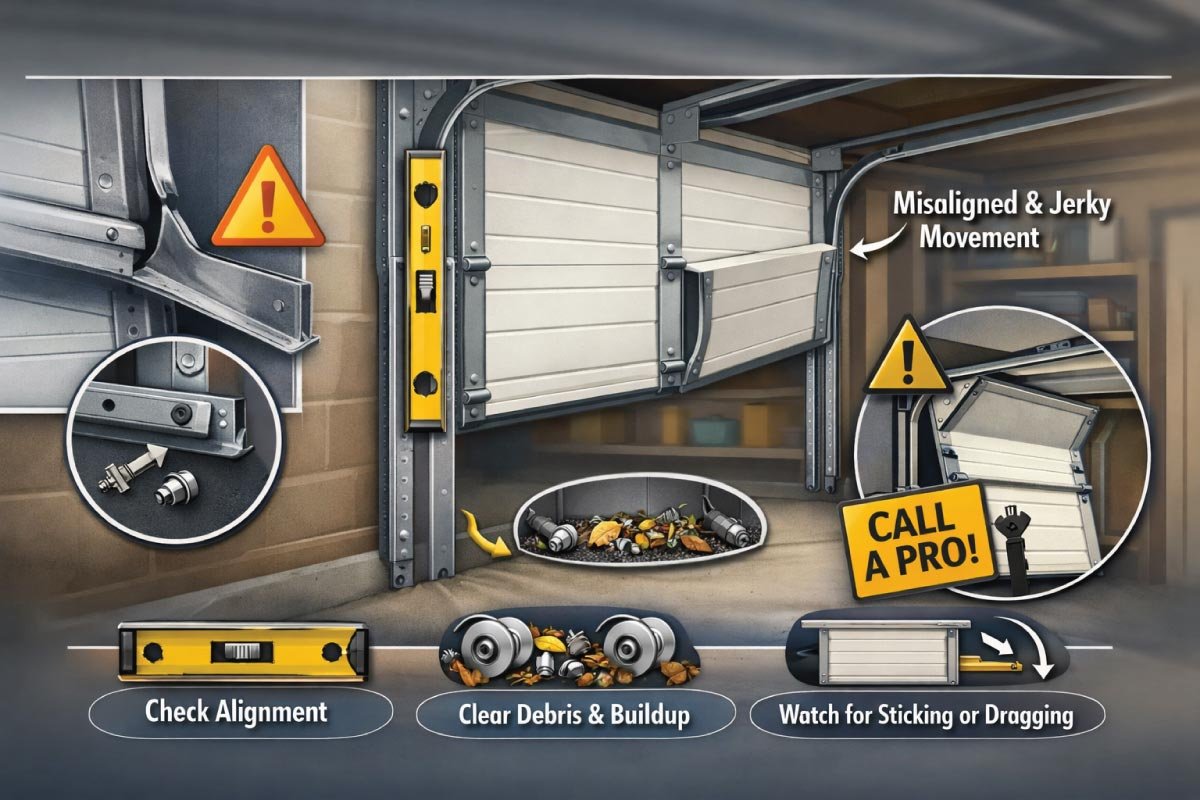
Tips for Inspecting Garage Door Tracks:
Check for visible dents, bends, or cracks along the entire length of the tracks.
Look for loose or missing fasteners and tighten bolts as needed.
Ensure the tracks are properly aligned vertically and horizontally; misalignment can cause jerky movement.
Remove debris, dust, or buildup that could obstruct the rollers.
Observe the door as it moves to see if it sticks, jerks, or drags on one side.
Regular lubrication keeps your garage door operating smoothly and quietly while extending the life of its components. Rollers, hinges, tracks, springs, and chains each require specific lubricants applied at recommended intervals. Following a consistent lubrication schedule reduces friction, prevents wear, and protects against rust, ensuring safe, reliable, and long-lasting door performance.
1- Garage Door Lubrication Guide
Regular lubrication is essential to keep your garage door running smoothly, quietly, and safely. Proper maintenance reduces friction between moving parts, prevents early wear, and extends component lifespan. By following a simple lubrication routine, you can avoid costly repairs and ensure reliable, long-term performance of your garage door system.
2- Lubricate Rollers for Smooth Operation
Rollers play a vital role in guiding your garage door along the tracks. Applying silicone or lithium-based grease to the roller bearings reduces friction and noise. Well-lubricated rollers move more freely, minimize strain on the opener, and help extend the lifespan of both the rollers and the entire door system.
3- Keep Hinges Well-Maintained
Hinges connect the sections of your garage door and allow smooth bending during operation. Regular lubrication reduces squeaking and friction at pivot points. This improves flexibility, prevents metal wear, and maintains structural integrity, ensuring your garage door opens and closes efficiently without putting extra stress on connected components.
4- Maintain Tracks with Proper Care
Garage door tracks must remain clean and lightly lubricated for smooth operation. Use a dry silicone spray instead of heavy oil to avoid dust buildup. Clean tracks combined with proper lubrication reduce resistance, prevent sticking, and ensure the door moves evenly without jerks or alignment issues.
5- Protect Springs from Corrosion
Garage door springs operate under high tension and require careful maintenance. Applying a light silicone spray helps protect them from rust and corrosion. Lubricated springs function more smoothly, reduce system strain, and last longer, lowering the risk of sudden breakage and improving overall door performance.
6- Lubricate Opener Chain if Needed
If your garage door uses a chain-driven opener, proper lubrication is important for smooth functioning. Applying lithium grease reduces friction and noise during operation. This helps the chain move efficiently, prevents premature wear, and ensures the opener motor works without unnecessary strain or performance issues.
7- Follow a Regular Maintenance Schedule
A consistent lubrication schedule, ideally every six months, keeps your garage door in top condition. Regular maintenance prevents unexpected breakdowns, improves performance, and extends the lifespan of all components. Simple, routine care ensures your garage door remains reliable, safe, and efficient throughout the year.
👉 Explore different garage door types and learn how to choose the best one for your home and budget. From durability to design and functionality, this guide covers everything you need to know. Make a smart decision and avoid costly mistakes—read the full post now for expert tips and insights.
Examine the Springs
Garage door springs play a crucial role in balancing the door and reducing strain on the opener. Worn, broken, or rusted springs can make the door difficult to lift and overwork the motor. Regular inspection helps identify gaps, uneven movement, or unusual noises, ensuring safe, smooth, and reliable operation while preventing sudden failures.
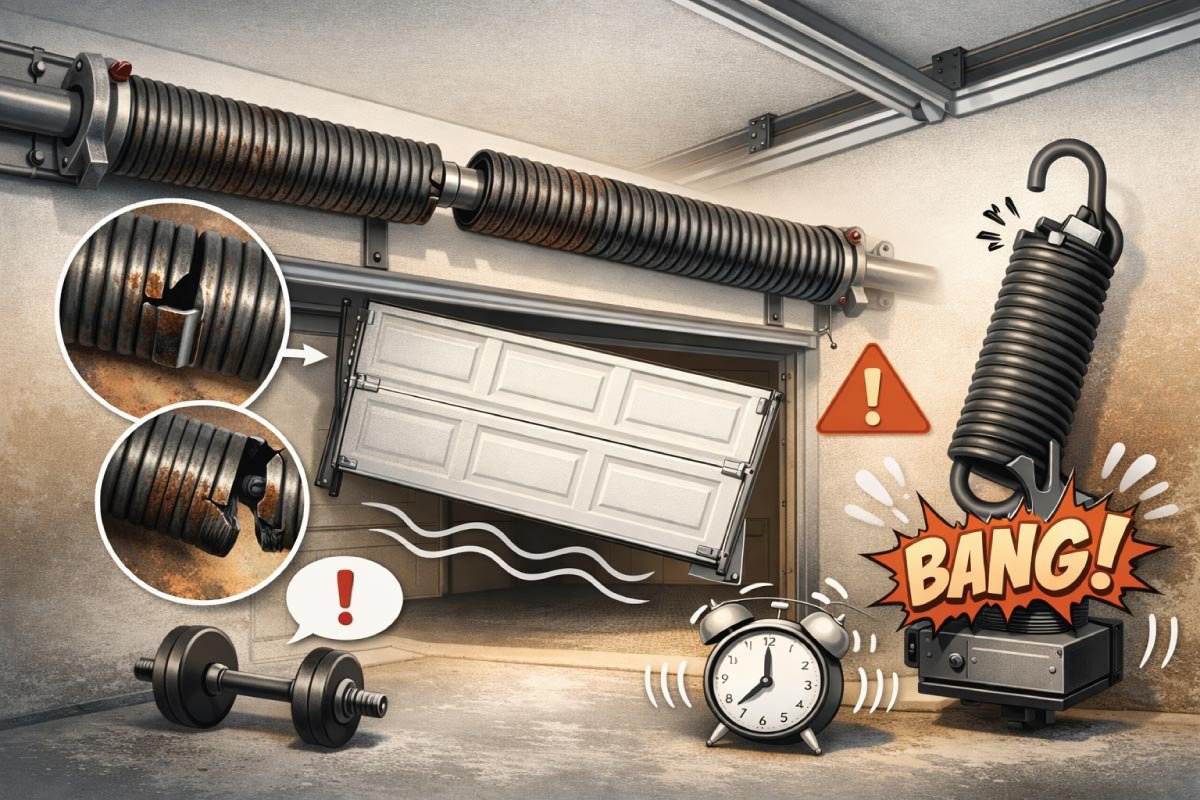
Tips for Examining Garage Door Springs:
Look for visible gaps, broken coils, or rust on torsion and extension springs.
Check if the door feels unusually heavy or hard to lift manually.
Observe uneven door movement, tilting, or jerking when opening or closing.
Listen for loud bangs or snapping noises, which indicate a spring has failed.
Check the Motor Unit
Tips for Checking the Motor Unit:
Listen for unusual sounds such as humming, grinding, or buzzing during operation.
Observe if the motor runs but the door doesn’t move, indicating gear or chain problems.
Check for a burnt smell, which may signal overheating or electrical issues.
Inspect the motor casing for visible damage or loose connections.
Ensure the motor is properly lubricated where applicable.
Test the motor with the door manually disconnected to isolate the issue.
Reset the Garage Door Opener
Minor glitches can cause the opener to stop responding. Performing a reset, as outlined in the user manual, clears errors, recalibrates the system, and restores smooth, reliable operation without complex repairs.
Garage Door Opener Reset Guide
Sometimes a garage door opener stops responding due to minor glitches. Performing a reset clears errors, recalibrates the system, and restores smooth operation. By safely unplugging, waiting, and following the reset steps, you can quickly troubleshoot issues without complex repairs, ensuring your door opens and closes reliably and quietly every time.
| Step | Action | Notes | Pro Tip |
|---|---|---|---|
| 1 | Unplug the opener | Ensure power is completely off | Prevents accidental activation during reset |
| 2 | Wait 1–2 minutes | Allows the system to discharge | Gives the opener time to clear minor errors |
| 3 | Plug the opener back in | Restore power | Check that the opener light turns on |
| 4 | Press the reset button | Location varies by model | Refer to the manual for exact instructions |
| 5 | Test door operation | Open and close the door fully | Ensure smooth, quiet movement and proper response |
Inspect the Gears and Chain
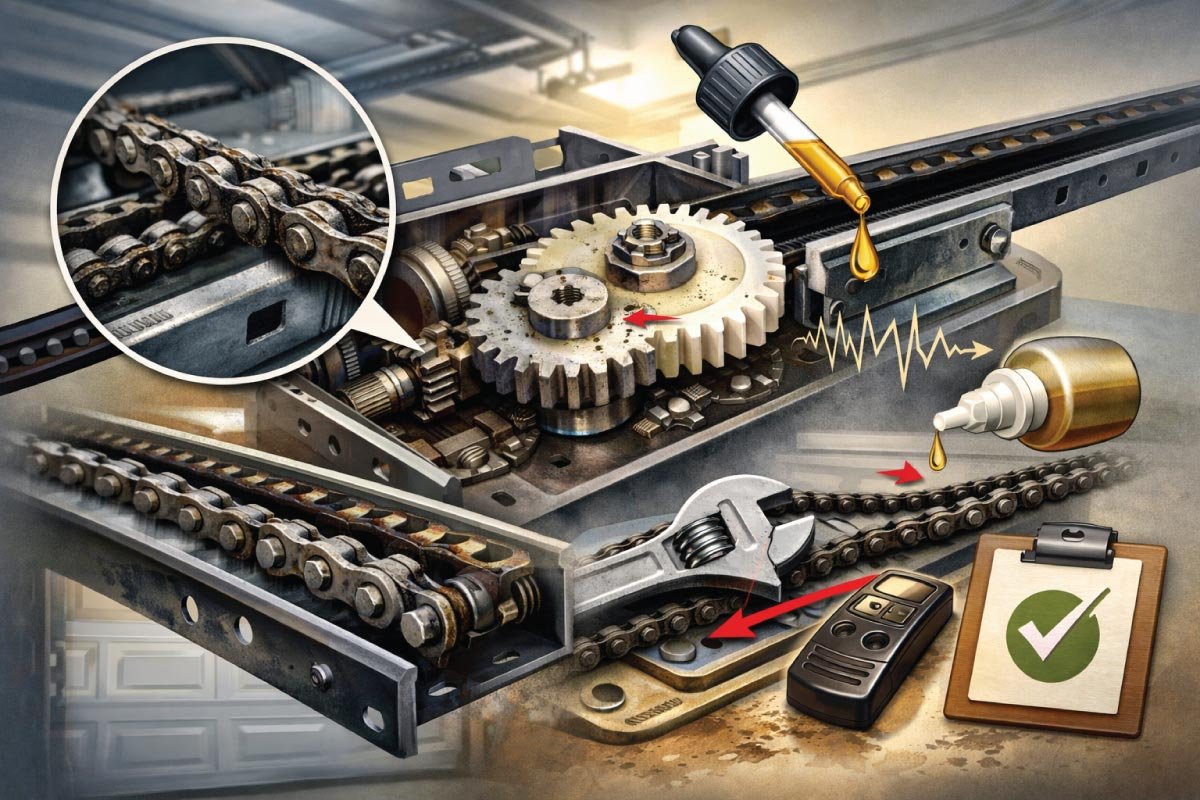
Tips for Inspecting Gears and Chain:
Examine the drive chain or belt for visible wear, fraying, or stretching.
Check gears inside the opener for worn or broken teeth.
Listen for grinding or unusual noises during operation, which can indicate gear issues.
Ensure the chain or belt has proper tension; neither too tight nor too loose.
Check for Remote Interference
Tips to Reduce Remote Interference:
Move nearby wireless devices or routers away from the garage opener.
Avoid using LED or fluorescent lights that may emit interference near the opener.
Reprogram the remote to a different frequency if your opener allows it.
Upgrade Your Garage Door Opener
Older garage door openers may struggle with heavier doors or lack modern safety features. Upgrading improves reliability, reduces noise, adds smart-home integration, and protects the door system from wear and potential malfunctions.
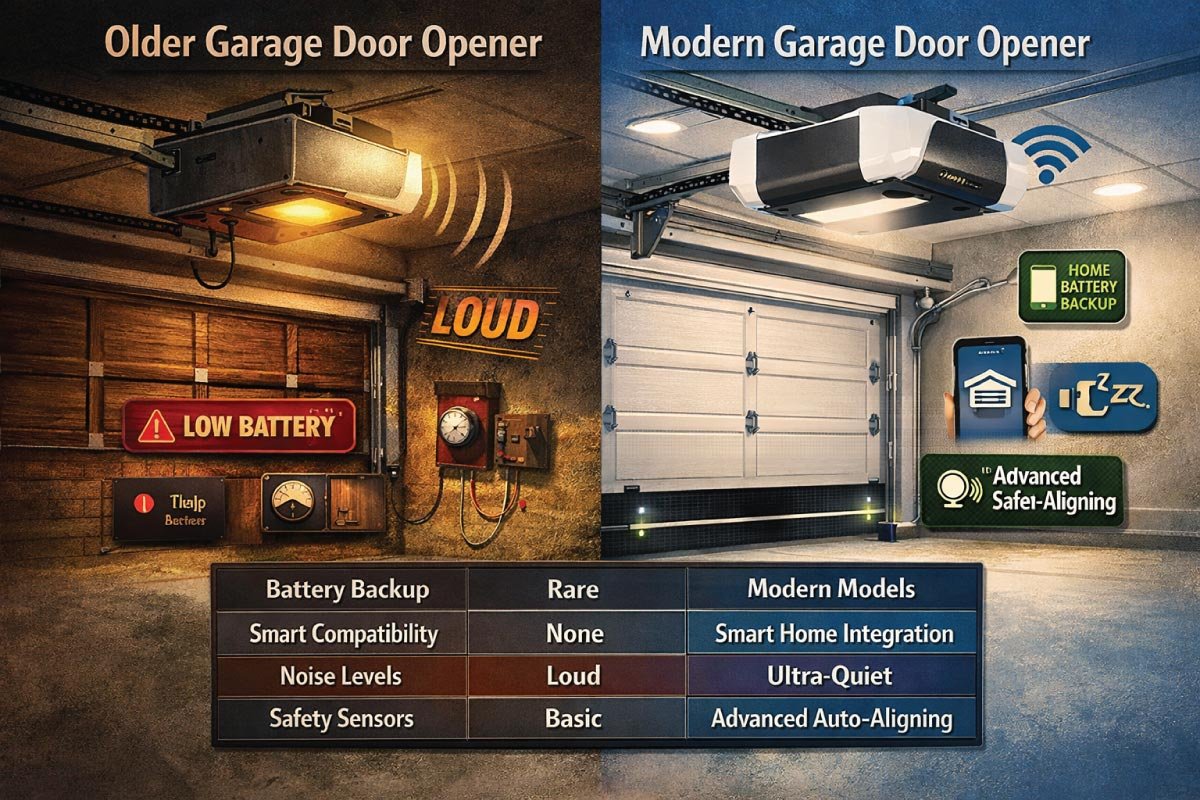
Garage Door Opener Comparison
Garage door openers have evolved significantly over the years. Modern models offer features like battery backup, smart-home compatibility, ultra-quiet operation, and advanced safety sensors, while older units often lack these conveniences. Understanding the differences helps homeowners decide whether an upgrade can improve reliability, safety, and overall door performance.
| Feature | Older Models | Modern Models |
|---|---|---|
| Battery Backup | Rare | Standard |
| Smart Home Compatibility | None | Yes |
| Noise Levels | Loud | Ultra-quiet |
| Safety Sensors | Basic | Advanced, auto-aligning |
Conclusion
A garage door opener that doesn’t respond can disrupt daily life and pose safety risks. Many issues, like dead batteries, misaligned sensors, or minor mechanical problems, can be quickly identified and resolved with basic troubleshooting, saving time and preventing further damage.
Regular maintenance—lubricating rollers, cleaning tracks, inspecting springs and cables, and checking sensors—extends component life and reduces unexpected breakdowns. While some repairs are manageable for homeowners, high-tension springs or torsion cable issues require professional attention.
Combining maintenance, prompt repairs, and certified technician support ensures a safe, reliable, and long-lasting garage door system.
👉 Discover the ultimate complete garage door guide covering basics, repairs, and maintenance tips to keep your door running smoothly. Learn how to prevent common issues, improve performance, and save on costly repairs. Don’t miss these practical insights—read the full post now and keep your garage door in perfect condition.

Engineer Ali Usman is a professional garage door expert and author at FixFasty, with over 10 years of hands-on experience in garage door systems and mechanical maintenance. He writes clear, step-by-step guides on garage door repairs, parts, and safety practices, helping homeowners fix problems correctly and maintain smooth, secure, and long-lasting garage door performance.